Rodents make up the most numerous group of mammals, with 2277 species, accounting for 41% of the known mammals. They are a very diverse group in both size and habitat, ranging from the South American capybara weighing up to 66kg, to the Baluchistan pygmy jerboa, the female adults of which weigh less than 4gm.
Types of Rodents
Rodents are found on every continent except Antarctica. They live in a wide range of different habitats from snow-covered tundra to hot deserts. Some species of rodent are also the common invaders of the human environment:
Rats
Mice
Voles
Squirrels
Marmots
Hamsters
Guinea pigs
Gophers
Prairie dogs
Porcupines
Beavers
Capybaras (but not rabbits, hares and shrews).
Characteristics of Rodents
The distinguishing feature of rodents is a pair of continuously growing, incisor teeth in their upper and lower jaw. These teeth grow throughout the life of the rodent so it must continuously wear them down to prevent them becoming too long.
Rodents are known to be the following, depending on their species:
Arboreal
Burrowing
Semiaquatic
They use a variety of different methods of locomotion including quadrupedal walking, running, climbing, bipedal hopping, swimming and gliding. Some are nocturnal and some are diurnal. Rodents tend to be social animals, living in small to very large colonies. They also have the ability to breed rapidly in favourable conditions, which is one of the reasons why they are such a concern when you have an infestation in your home or business.
The majority of rodents are herbivores, feeding on seeds, nuts, roots, tubers, stems, leaves, flowers and fruit. Some are omnivores, eating meat such as insects opportunistically and a small number are carnivores.
Useful rodents
Rodents are not just pests, they have been used throughout history for food, fur, and more recently as pets and laboratory animals. Guinea pigs were a major meat source for the Incas, while dormice were a delicacy of the Romans, who kept them in special pots and enclosures. Many cultures around the world still eat wild rodents because they are readily available sources of meat.
How to Get Rid of Rats
A rat elimination program usually consists of sanitation and rat removal. Sanitation will help eliminate the food and water sources rats are using to survive, which also helps in the prevention process. Rat removal methods will vary depending on the personal preferences of the structure owner and their individual level of infestation.
Sanitation is the single most important measure of control in getting rid of a rat problem. Rats must have access to a ready supply of food and water to thrive and harborage to nest.
To reduce rat populations, try the following sanitation measures:
Store any bulk food items in large metal containers with tight fitting lids, rather than bags or boxes that can easily be gnawed through.
Keep dog food or other pet food stored in a Rubbermaid container overnight.
Remove clutter such as paper and cardboard that rats might use to build their nests
Remove grass clippings and yard debris near structure
Trim up shrubs and bushes so they do not touch your home and so you can see beneath them
Store firewood away from structure
Pick up fruit and nuts that fall from trees
After you have followed the sanitation measures outlined above you can start the rat removal process. There are several methods available for both indoor and outdoor rat control and you should choose the method(s) that best fits your needs and preferences.
Glue traps, snap traps and live catch traps
Products needed : selected trap, bait for trap
Trapping is the preferred method of indoor control. There are several advantages to using traps for rat removal indoors. Trapping does not require the use of rat poisons indoors. Trapping does allow you to know if a rat has been trapped so that you can can be sure your efforts are working. And last, trapping allows you to remove the carcass to avoid bad odors and secondary insect infestations from decaying carcasses.
A Step-by-Step Guide for Getting Rid of Mice
You may think getting rid of mice isn’t a huge priority. How much harm could they truly cause? Unfortunately, the answer is a lot. Mice may appear to be all cute and cuddly… but don’t be fooled! They can cause some serious destruction to your home and health. This is why hiring a professional pest control company will benefit you greatly.
ARE MICE REALLY A THREAT? I’M NOT CONVINCED.
The short answer is absolutely. Mice are known as nibblers, meaning they’ll put anything and everything in their mouth, even electrical wires. In fact, experts have found that nearly a quarter of house fires can be traced back to damage caused by a rodent. Although they’re small, their teeth are mighty and can puncture wood, plastic, vinyl, aluminum and even concrete if not cured properly.
Not only are they destructive, but they’re also a threat to your health. It’s estimated that rodents invade nearly 21 million homes in the U.S. every winter, and we’re not talking gifted pet mice during the holidays. A wild mouse infestation can cause way more than just a headache for families. Exposure to their droppings, urine, and saliva can cause serious illnesses such as hantavirus, bubonic plague, and salmonellosis. Their destruction combined with being carriers of the infectious disease makes these little critters a major cause for concern.
EASY STEPS FOR GETTING RID OF MICE
There are a lot of homeowners out there who like to take matters into their own hands. You’re not required to use a professional rodent exterminator, but if you decide not to we want to make sure that you have the information you need. We’ve outlined 5 easy steps for getting rid of mice and making sure they stay gone.
Find and Eliminate All Entry Points
The first step in getting rid of mice is figuring out where they initially came from. They most likely squeezed under cracks in doors, holes in insulation, unsealed basement windows, pipes, or any other dime-sized opening. These obnoxious little critters are equal parts crafty and determined. If there’s a will there’s a way and they certainly have a will.
How to Get Rid of Rodents
When you have unwanted visitors in your home such as rats or mice, there are some steps you can take before calling in professional rodent control. The first thing to do is to read our guide to getting rid of rodents.
Choose a Method
There are many kinds of rodent control available and they fall roughly into the following three groups: snap traps, which use spring-loaded bars to kill mice or rats; cage traps that tunnel the rodent in and then capture it; and poison bait, which will kill the rodent after it eats it. Snap traps are commonly used to kill mice and rats within homes. For best results these traps should be set flush to walls, with the trigger plates facing the wall.
Rodents generally travel with their bodies against the wall for protection. Cage traps capture live prey and are used when the homeowner does not want to harm the rodent. To avoid re-infestation, mice may be freed 500 metres from the house, but rats must be released at least 3,000 metres away so they do not find their way home.
Poison traps, pellets and bait should not be used within the house because the rodent may eat the poison and then die in wall cavities or under floor boards, creating unpleasant odours. The control devices picture
Set the Trap
If you have selected a snap or cage trap, you will need to set it up correctly for best results. Mice are quite curious and will approach a new trap and easily get caught. Rats however are more cautious and will not approach anything new. Consequently, rat traps should be left without any bait for at least a couple of days until the rats are fully familiar with the trap. Then the trap is baited and the rat will be caught
Mouse and rat behaviour
The deer mouse (Peromyscus maniculatus), the house mouse (Mus musculus) and the brown rat (Rattus norvegicus) have long lived in proximity to humans. But that’s no reason to tolerate their presence if they get too close to us!
Rats and mice both belong to the family Muridae, and have spread from Central Asia to nearly every part of the world. They were likely introduced (involuntarily) to North America by European colonists. The house mouse is small, reaching no more than 30 g in weight
It is recognizable by its large ears, long tail, brown back and grey belly. The deer mouse, which is more common in rural areas, has brown-white fur with a white underside and feet, and its tail is as long as its body. The brown rat, also known as the sewer rat or Norway rat, has a stocky body and can weigh up to 450 g (1 lb).
In the fall, mice and rats seeking warmth and food are attracted to barns and other farm buildings, warehouses, landfills, houses, etc. These rodents will then be active in those locations all winter long, since they do not hibernate.
Are mice and rats useful or bothersome?
Some rats (specially bred strains of brown rats) and mice (albino house mice) are used in laboratories for scientific research.
Both rats and mice are popular as pets, alongside gerbils, chinchillas and other small rodents.
In the wild, both types of rodent are prey for several species of mammals and raptors.
Save yourself and your family from stings this season by crafting this homemade wasp trap from your kitchen recyclables.
Nothing can ruin a summer barbecue or evening by the pool like the threat of a wasp’s sting. Mind you, wasps aren’t all bad—the adults are nectar-eating pollinators, and they kill other insects (often those harmful to crops) to feed their carnivorous larvae. Still, a nearby nest can be dangerous, especially to those who are allergic to their sting. Should you find an infestation around your own home, you have a few options: call a pest-control company, kill them yourself with sprays, or trap them. While wasp traps are available for purchase, save yourself some money and get rid of your buzzy problem by crafting this hands-off solution using items you most likely already have sitting in your house.
STEP 1: Cut up a 2-liter plastic bottle to create the trap.
Dig through your recycling to get the materials you need to make this trap, and get crafting. First, remove the bottle cap and cut the 2-liter soda bottle just under the neck, where the bottle becomes a straight cylinder. Invert the top portion of the bottle to serve as a funnel, and fit it inside the bottom half of the bottle. Tape the two pieces together around the cut edge so the funnel stays in place. Finally, poke two holes on opposite sides of the rim and attach some string to make a handle for hanging.
STEP 2: Prepare the bait for your trap.
You’ll never catch any wasps without the right kind of bait—and the perfect lure is wholly dependent on the season. In early spring, when wasps are reproducing, they are looking for protein; later in summer, they want sugar.
STEP 3: Position your trap off the ground.
You can set your traps out on the ground, but hanging them about four feet high will probably attract and catch more wasps. Find a good tree limb or fence post on your property—one that is at least 10 yards away from your family’s play, work, and gathering spaces—and hang up the homemade trap by its string handle
Things You Need to Know About ‘Murder Hornets’
If you haven’t been paying attention to the news over the past few weeks, you may not have heard about these huge hornets with massive stingers. The concern is legitimate, but just how worried about the hype should we really be? We’ve been getting a lot of questions about Murder Hornets
What is a Murder Hornet?
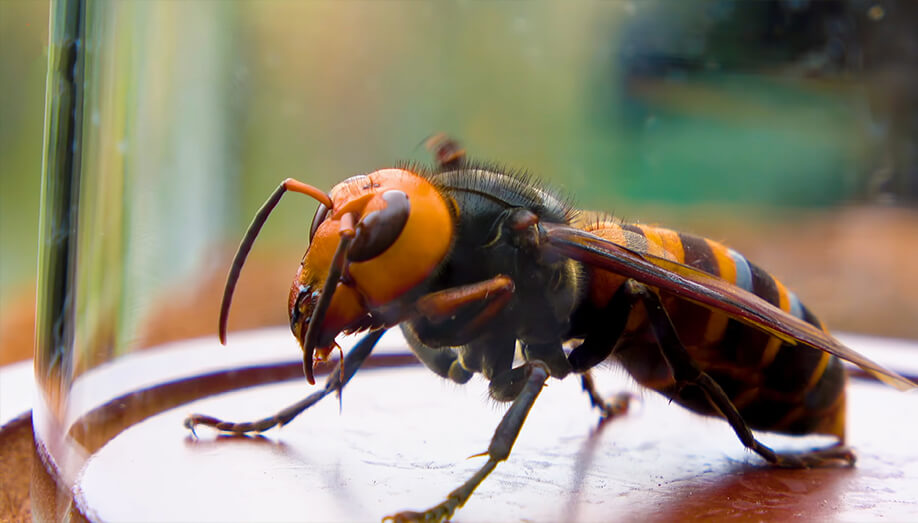
The name “murder hornet” was drummed up through social media to evoke fear and intrigue; the scientific name is vespa mandarinia, but it is more commonly known as the Asian Giant Hornet.
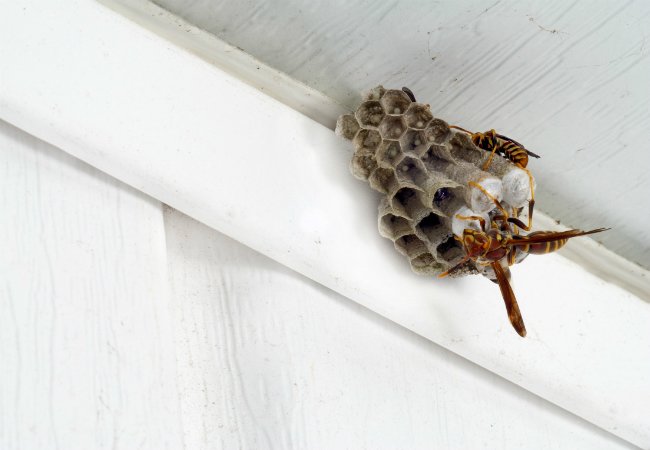
They can typically be found building subterranean nests by digging or by taking up residence in small burrows that rodents or other critters have already made. Nests will generally range anywhere from a few inches deep to approximately two feet down.
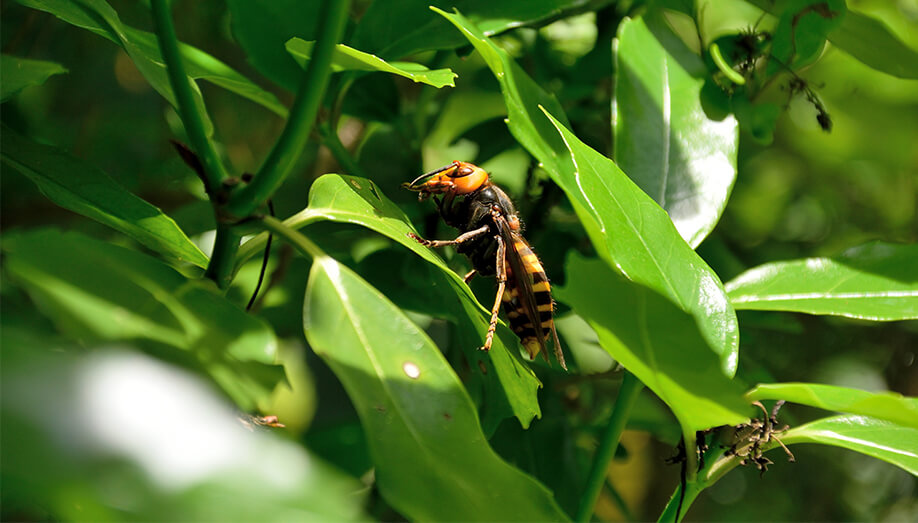
As it is primarily an insectivore, we believe the “murder hornet” name partially stems from how aggressive this hornet can be towards other bees, wasps and hornets. It only takes a small handful of these hornets roughly an hour to kill off a bee hive, slaughtering the entire hive in an effort to feed.
How big is a Murder Hornet, and what does it look like?
The Asian Giant Hornet is the biggest hornet on the planet, big enough that residents of Japan have referred to it as a “great sparrow bird.” Most are approximately two inches long, with a wing span of around three inches. The sheer size of this hornet makes its “buzz” so loud that you will often hear it coming before ever seeing it.
Telling apart the ‘murder hornet’ from hornets
“It appeared similar in size and markings,” said Terrill. “The discovery seemed uncanny. I had just read about the arrival of the Asian giant hornet in the Pacific Northwest the same day I found this giant hornet in my house.”
Terrill’s European hornet was unusually large because it was probably a queen, according to Scott Famous, local beekeeper and queen breeder, who examined the specimen. “She was probably looking for a place to start a new colony,” he said.
With the weather warming up and sightings of hornets sure to swell, I thought it would be useful to explore how the hornets common to the D.C. region differ from the Asian giant — or “murder” — hornet making news.
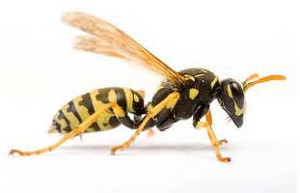
How can you tell the two apart? The Asian giant hornet, about 1½ to two inches long, is substantially larger than the European hornet, which tends to be a little over an inch long, as shown in the chart below. The Asian giant hornet has a head that is almost entirely yellow compared with the European hornet, which has a reddish-brown head that transitions to yellow around the face.
The Asian giant hornet is capable of destroying entire bee colonies and inflicting terrible stings with its quarter-inch stinger. The stinger is so powerful it can penetrate beekeeper suits. And the sensation of being stung is compared to a searing-hot thumbtack piercing the skin.
KEEPING WASPS AND HORNETS AWAY FROM THE HOUSE
Wasps and Hornets have created chaos for humans since the beginning of time. Despite being annoying and sometimes scary with their belligerent behavior and tendency to sting when provoked, wasps and hornets can also be very beneficial to have around. These flying insects are predators and feed on many other unwanted insects you can find in your backyard, offering free pest control. On the other hand, wasps and hornets can be dangerous as well. Unlike many varieties of bees, they can sting you repeatedly when angered; their painful stings can provoke allergic reactions — even venom anaphylaxis in some people — and can invade your personal space by building a nest in places like attics, eaves, and garages.
Sometimes, they can sneak in through your window and surprise you, buzzing around aggressively. These are unwanted guests you would never want in your home and often encourage panicking to find ways to get rid of them. In most towns and cities, you can call pest control services to deal with an infestation of hornets or wasps. These services are generally equipped to provide you with protection for a long time, months or whole season. On the flip side, these services can be quite expensive and not everyone can afford them. For those of you who prefer not to pay for an exterminator, here are a number of simple techniques that are inexpensive and can save your house from an infestation of wasps or hornets and you from being attacked by them.
Clove-Geranium-Lemongrass Oil Blend
What’s better in this world than using natural, organic blends to keep away hornets and other nasty flying insects? The excessive use of aerosols has its downfalls, most notably the ability to damage to our environment, and some pesticides are extremely dangerous as well. They not only have the ability to hurt people as well as plants, bees, and animals, so by using this natural blend you are not only fighting wasps and hornets but doing your bit to help conserve our environment.
Plain Old Soap + Water
Another eco-friendly way of keeping wasps and hornets away is by using soap and water in a spray bottle. This is one of the oldest methods to keep away such insects. Spraying a mixture of soap and water into their nests kills them instantly. This occurs because soap clogs the breathing pores of insects. As a result, it becomes very difficult for them to breathe and therefore, they eventually die. This is also a great mix for killing other nuisances such as boxelder bugs and some types of ticks.
Wasp repelling plants
Many people aren’t aware of this but some plants can actually repel pests. Plants such as citronella, thyme, and eucalyptus naturally deter insects like wasps and hornets. Growing these plants in your backyard will not only keep away these pests but also add beauty to your garden. It is a very effective as well as ongoing method of wasp control.
Selfless, Helpful and Intelligent: the Wasp; Yellow Jackets Much More Than the Evil Guests at the Picnic, Scientists Say
It is late summer, which means it is time to grit one’s teeth, get outside for a little family picnic, and practice that ever-fashionable dance routine, the Yellow Jacket Jive.
Yes, August is official yellow jacket month, as a number of entomologists have proclaimed on their Internet Web pages, and as anybody within range of a public trash can will attest. This is the season when the wretched little biblical plagues boil forth in force, bobbing and weaving like drunken marionettes, poking in fruit stands, crash-landing on soda cans, and haughtily, viciously, perniciously stinging any human who dares to protest
I’m better now. Sure, I’ve been stung a couple of times by yellow jackets, and, sure, both times I thought my leg had spontaneously combusted, but it turns out that yellow jackets are not the mean-spirited vermin their victims assume them to be. They are not nasty for nastiness’ sake. They are proactively defensive, family-values types that struggle selflessly to support and defend their kin. They may crave the same junk food we do, but they are not base freeloaders, and sometimes will even pitch in by hunting caterpillars, aphids, flies and other garden pests.
And to the entomologists who are beginning to piece together a portrait of their society, yellow jackets are fascinating insects, with all the sophistication of behavior found in bees, ants and other elaborately social insects.
Yellow jackets are not preprogrammed automatons, but learn from experience, including where and when to crash the best parties. They can communicate with one another, conveying their intentions, work assignments, the location of a hot new outdoor restaurant. Exactly how they communicate, though — whether through chemical signals, touch, sound or a kinetic language like bee dancing — is not understood.
If you have a problem with pests and you are thinking about hiring an exterminator to come in and help you out then you must consider a few different tips and tricks to help you find the best professional for your needs. There are actually some very important things that you have to consider. If you have never selected an exterminator before then you have to watch out for these things.
Pest Problem: First and foremost, you have to know what you are going to be exterminating. You have to know what type of bugs you are dealing with so that you know what type of exterminator you are looking for. All bugs and pests are going to respond differently to different types of treatments. If you do not know what type of bugs you have then you will not know what type of exterminator to call. Once you have established what type of pests you are dealing with and then you can move to the next step.
Candidates: Make a list of exterminators. Find out if each of the exterminators you are considering actually knows how to treat the pests that you have in and around your home. This can help you narrow down your search rather quickly. You do not want to pay a professional that cannot help you. Knowing the bugs that you have can help you avoid this problem.
Guarantee: Finally, always find out if the exterminator that you are thinking about hiring will come back and treat the area again if they need to. The best exterminators are going to come back and treat the area a few times. If you really start doing your research you are going to see that many of the companies out there are going to be able to offer you different contracts and guarantees. Take the time to read these in order to see which one will give you the most service for your money. Then you will know that they are going to come back and treat again and you will not have to worry about paying for it. Yes, these guarantee contracts can be expensive but they will be worth it in the end.
Factors to Consider While Selecting the Pest Control Company
The first thing you need to do is check on the following factors before moving on to choosing a pest control company.
License to Operate: Determine if the pest control contractors have a license to operate in your state. Also, check if the organizations hold any special certifications to authenticate their expertise. You can contact the state’s pesticide regulatory agency to check the validity of the license held by the contractor. You can also enquire about the types of licenses that contractors are required to provide pest control services.
You can also check if the contractors are affiliated with any other national pest control associations like Association of Structural Pest Control Regulatory Officials (ASPCRO). This will prove their knowledge and expertise in pest control operations and regulations.
Liability Insurance: After license verification, the next step is to determine if the pest control companies offer liability insurance against damages caused during the pest control operations. This is especially important if you are trying to eradicate insects like termites from your premises. If the pest control company doesn’t offer any liability insurance, you can enquire about preventive steps taken by them to safeguard the property.
BEWARE OF COMPANIES OR INDIVIDUALS THAT…….
Want to do pest control as part of a package deal, such as general home repair or tree trimming or that will give you a special price if treatment is done immediately.
Don’t have a listed or working telephone number.
Sell services door-to-door or target the elderly or infirm persons who live alone. CHECK THEIR IDENTIFICATION AND CREDENTIALS!!!
Arrive unexpectedly and show you insects they have found in your neighbors house as evidence of a neighborhood problem.
Quote a per-gallon price. Termite control can require several hundred gallons of diluted insecticide.
Claim to have a secret formula. All pesticide products must be registered by the U.S. EPA and the States Departments of Agriculture. Registered pesticide labels contain a list of active ingredients.
Try to pressure you into immediately signing a contract by suggesting your house is structurally unsound and may collapse if not treated.
Claim to have excess material left over from a previous job and offer a reduced price for immediate treatment.
Claim to be endorsed by the States Departments of Agriculture, the U.S. EPA or other government agency. Government agencies DO NOT endorse any service company or specific pesticide product.
7 Steps to an Effective Pest Management Program
IPM programs are successful for a simple reason. They recognize that pest management is a process, not a one-time event, and that relying solely on chemical controls when so many other tools are available is never the best solution. By addressing the underlying causes of pest infestations – access to food, water and shelter – IPM can prevent infestation before pesticides are even considered. In practice, IPM is an ongoing cycle of seven critical steps:
Step 1: Inspection
The cornerstone of an effective IPM program is a schedule of regular inspections. For food processors weekly inspections are common, and some plants inspect even more frequently. These routine inspections should focus on areas where pests are most likely to appear – receiving docks, storage areas, employee break rooms, sites of recent ingredient spills, etc. – and identify any potential entry points, food and water sources, or harborage zones that might encourage pest problems.
Step 2: Preventive Action
As regular inspections reveal vulnerabilities in your pest management program, take steps to address them before they cause a real problem. One of the most effective prevention measures is exclusion, i.e., performing structural maintenance to close potential entry points revealed during inspection. By physically keeping pests out, you can reduce the need for chemical countermeasures. Likewise, sanitation and housekeeping will eliminate potential food and water sources, thereby reducing pest pressure.
Step 3: Identification
Different pests have different behaviors. By identifying the problematic species, pests can be eliminated more efficiently and with the least risk of harm to other organisms. Professional pest management always starts with the correct identification of the pest in question. Make sure your pest control provider undergoes rigorous training in pest identification and behavior.
Step 4: Analysis
Once you have properly identified the pest, you need to figure out why the pest is in your facility. Is there food debris or moisture accumulation that may be attracting it? What about odors? How are the pests finding their way in – perhaps through the floors or walls? Could incoming shipments be infested? The answers to these questions will lead to the best choice of control techniques.
Step 5: Treatment Selection
IPM stresses the use of non-chemical control methods, such as exclusion or trapping, before chemical options. When other control methods have failed or are inappropriate for the situation, chemicals may be used in least volatile formulations in targeted areas to treat the specific pest. In other words, use the right treatments in the right places, and only as much as you need to get the job done. Often, the “right treatment” will consist of a combination of responses, from chemical treatments to baiting to trapping. But by focusing on non-chemical options first, you can ensure that your pest management program is effectively eliminating pests at the least risk to your food safety program, non-target organisms and the environment. You’ll also see higher pest control scores at audit time.
Step 6: Monitoring
Since pest management is an ongoing process, constantly monitoring your facility for pest activity and facility and operational changes can protect against infestation and help eliminate existing ones. Since your pest management professional most likely visits your facility on a bi-weekly or weekly basis, your staff needs to be the daily eyes and ears of the IPM program. Employees should be cognizant of sanitation issues that affect the program and should report any signs of pest activity. You don’t want to lose a day when it comes to reacting to an actual pest presence.
Step 7: Documentation
Let’s face it, the food safety auditor’s visit can make or break your business. Since pest control can account for up to 20 percent of your total score, it’s imperative that your IPM program is ready to showcase come audit time. Up-to-date pest control documentation is one of the first signs to an auditor that your facility takes pest control seriously. Important documents include a scope of service, pest activity reports, service reports, corrective action reports, trap layout maps, lists of approved pesticides, pesticide usage reports and applicator licenses.
Professional Pest Control
Ultimately, regardless of how much you educate yourself, you are not going to approach the experience and flexibility of a major pest control company. If this sounds like too much work to you, you will probably want to employ the services of a professional. Pest control companies know the optimal place to treat, and how often to keep treating to give you the best chance of permanently keeping the problem at bay. Additionally, many companies offer service guarantees, particularly for stubborn pests like termites, and offer no cost return visits until the infestation is rectified.
Have you
discovered bed bugs in your home or have bites from bed bugs? A treatment by a
professional pest control company or exterminator may not be in your budget or
work with your schedule.
Luckily, it
is possible to treat a bed bug infestation yourself without spending a fortune.
You must be diligent and committed to the treatment process, but you can
eliminate bed bugs yourself! Read our guide below for the 4-step DIY bed bug
treatment process.
STEP 1: Preparing
a Room for Bed Bug Treatment
Before you
begin your own bed bug treatment, you will need to prepare the room or rooms
where bed bugs have been found, in addition to rooms that share walls with the
infested rooms. Remove any items in the room that you absolutely cannot treat
or that have already been treated. Cover items that will be removed from the
room in plastic bags before moving to the next room to prevent any unseen bed bug
from infesting another room.
Remove any
paintings or art from the walls. Be sure to thoroughly check any item that is
removed from the room to prevent bed bugs from being transferred from room to
room.
If you have
a mattress that is heavily infested, we recommend covering it with a bed bug
proof mattress cover or bed bug mattress encasement before moving. You will
also need to cover your box spring with a box spring encasement.
If your
mattress needs to be disposed of and replaced, be sure to cover the mattress
with plastic before disposing to protect sanitation workers. Labeling a
mattress or covering with “Bed Bugs” is also helpful.
Infested
sheets, linens, and garments should be washed and then dried in a household
dryer on high heat (over 120 degrees F), as the heat will kill bed bugs. Any
garments that cannot be washed may need to be dry-cleaned or discarded as
insecticides cannot be used on these materials.
If stuffed
animals, books, or soft toys are infested, place those items in an air-tight
bin along with vapor strips to kill the bed bugs.
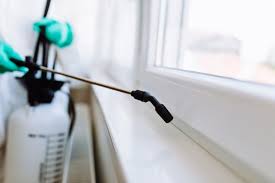
STEP 2: Treat
the Cracks, Crevices, Tufts, and Folds of Your Home for Bed Bugs
Some bed bug
products cannot be used where others can. Also, bed bugs can build up a
resistance to certain pyrethroids, making them difficult to treat. This is why
using a variety of products to kill and control bed bugs will produce the best
results. We recommend using one of our bed bug kits. These kits include our
most powerful and effective products for a variety of applications to save you
time and money.
STEP 3: Treat
Your Mattress for Bed Bugs
To get rid
of bed bugs in a mattress, use an aerosol spray labeled for bed bug treatment,
such as Bedlam Aerosol Spray, and spray or mist the insecticide onto the
mattress. Focus on the seams, tufts, and folds of the mattress and spray until
the mattress is damp. Allow mattress to dry before remaking the bed with
freshly laundered sheets that have been run through a dryer on high heat.
After
treating a mattress or box spring for bed bugs, we recommend encasing each in a
bed bug proof cover. This will prevent re-infestation and will make future
inspections and treatments easier. Be sure any product that has been sprayed or
applied to your mattress is dry before you cover the mattress with a bed bug
proof cover. You can make the bed with your freshly laundered linens over a bed
bug proof mattress cover.
After
encasing, you will not need to re-treat your mattress or box spring further. If
you are not encasing your mattress or box spring, you will need to reapply the
aerosol spray every 7-10 days until you do not see any further bed bug
activity.
You can follow
the initial aerosol spray treatment with an insecticide dust. Dusts are great
for hard to reach areas like the corners of mattresses and where mattresses and
box springs meet. Dusts also last for several months.
Don’t forget
to dust your box spring as well. Remove the dust cover from the bottom of the
box spring and dust in corners and crevices.
Again, we
highly recommend encasing your mattress and box spring to avoid having to
re-treat.
Characteristics of Bed Bugs
To continue
cycles of mating and egg production, males and females must feed (consume a
bloodmeal) once every 14 days. With regular feeding, a female can lay 1-3 eggs
daily and 200-500 eggs in her lifetime. Should a bed bug’s regular feeding be
interrupted, however, it can still survive for several months on one meal.
Bed bugs are
not known to travel large distances on their own. However, they will attach
themselves to movable objects such as bedding, boxes, clothing, and furniture.
Besides residences, bed bugs are known to inhabit a variety of interior
settings like offices, stores, hotels, and gyms.
Step 1:
Determine the Severity of the Problem
Determine
Severity
Most bed
bugs are found within eight feet of a place where a human is resting. But as
their population grows, so does their footprint in your home. That’s why it’s
important to check the following areas:
Mattresses,
box springs, and bedding
In
curtains and behind peeling wallpaper
Under
carpet
Cracks
in furniture and in hardwood floors
Piles
of clothing
With your
flashlight and credit card, search and probe crevices to check for bed bugs. If
you see these pests moving, capture them with adhesive tape. Wipe the area with
soapy water to clean away any dead bed bugs, droppings, eggs, and shed skins.
Also consider vacuuming the area for an even deeper cleaning.
If you have
one or more rooms with substantial clutter or items strewn about, you’re
providing bed bugs with a haven. The simple act of reducing clutter deprives
these pests of breeding areas. But if you can see bed bugs, black or brown
stains that indicate droppings, or if you experience bites, you’re likely
dealing with an infestation.
Step 2:
Build a Plan to Stop Further Infestation
Build A Plan
With their
ability to hide, their tiny size, and their frequent reproduction, you may find
it challenging to remove bed bugs from your home. Making matters worse, the egg
stage of a bed bug’s life is actually quite resistant to many forms of
treatment. Recognize that ridding your home of these pests make take a number
of steps.
Step 3: Take
Action to Eliminate the Bed Bugs
Take Action
Your DIY
tactics will play an important role in evicting pests. Experts suggest the
following tasks to clean rooms, wipe out bed bug homes, and discourage their
spread:
De-clutter
rooms of your house or apartment
Buy
a mattress encasement to protect your mattress and box spring
Vacuum
multiple times each week as you fend off the pests
Wash
and dry your clothes at the hottest setting (at least 120 degrees) to kill any
bed bugs
Apply
caulk to cracks and crevices seen in walls and door frames
Contact
a pest control specialist if signs of infestation continue
Step 4:
Check Your Results
Check Your
Results
Give your
efforts a full week to take effect. This should be enough time in case any eggs
were missed during cleaning. If the results are not to your liking, contact a
pest control specialist. The infestation may require an insecticide, which is
best handled and deployed by a professional.
Bed Bugs and
Humans
Remember
that bed bugs are not known to carry diseases to humans. But our exposed areas
of skin – the hands, neck, face, leg, and arms – are open targets to bed bugs
when we sleep.
You may not
even be aware of a bed bug bite since these are not known to be painful. In
fact, hours or days may pass before you notice signs like swelling, bleeding,
or secondary infection at the site(s) on your skin if the bites are not
cleaned. This reaction is more likely in small children, the elderly, and
people with weakened immune systems.
Weather and
Seasonal Behavior of Bed Bugs
Higher
temperatures are a bed bug’s ally for a few reasons. First, heat quickens the
pest’s life cycle. In everything from feeding to the maturing of eggs to
general movement, hotter days are a bed bug’s comfort zone.
This means
that your home is potentially a prime habitat for bed bugs throughout the year.
Because winter temperatures are extremely uncomfortable to bed bugs – and sends
them into a dormant state called diapause – they will always seek a warmer
environment. The controlled climate of your home provides a setting where they
can be active all year. If the clothes we wear carry these pests, then we help
them reach new sites for infestation. This means that controlling and
eliminating bed bugs can be done at any time on the calendar.
Removing bedbugs
Bedbugs
measure just 5 millimeters across—smaller than a pencil eraser. These bugs are
smart, tough, and they reproduce quickly. Bedbugs know where to hide to avoid
detection, they can live for months between meals, and a healthy female can lay
500 eggs in her lifetime.
No surprise
that these tiny bloodsuckers can wreak a lot of havoc in your home. If they get
into bed with you, they can leave red, itchy welts all over your body.
Fortunately,
you can get rid of bedbugs. Be patient as removing bedbugs often takes some
time and effort. You may have to try a few different chemical and non-chemical
approaches, especially if you have a large infestation.
Certain
factors can make bedbugs harder to remove. You may have a tougher time ridding
your home of them if you have a lot of clutter, or you travel often and bring
new bedbugs home in your luggage.
If you can’t
rid your home on your own, you may have to call in a professional exterminator.
Read on for a step-by-step guide on getting rid of bedbugs.
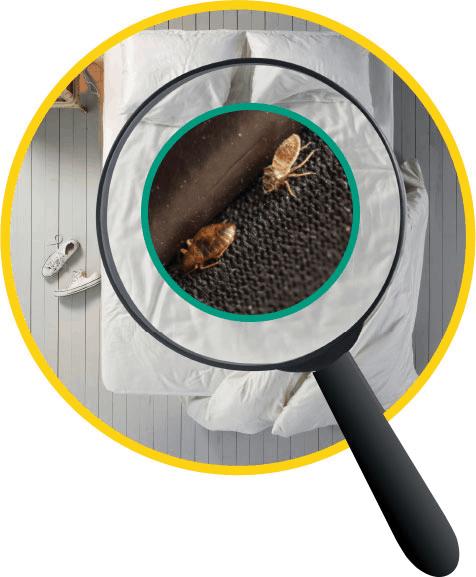
Step 1:
Identify all infested areas
If you’ve
got bedbugs, you want to find them early before they start to reproduce. It’s
much easier—and cheaper—to treat a small infestation than a big one. Yet
smaller infestations can be harder to detect.
Search for
bedbugs yourself, or hire a professional to do an inspection. Some inspectors
use specially trained dogs to hunt down bedbugs by scent.
Bedbugs’
small, narrow bodies enable them to squeeze into tiny spots—like the seams of a
mattress or couch, and the folds of curtains.
Also look
for them in places like these:
near
the tags of the mattress and box spring
in
cracks in the bed frame and headboard
in
baseboards
between
couch cushions
in
furniture joints
inside
electrical outlets
under
loose wallpaper
underneath
paintings and posters on the walls
in
the seam where the wallpaper and ceiling meet
Use a
flashlight and magnifying glass to go over all of these areas.
You can spot
bedbugs by these signs:
live
bedbugs, which are reddish and about ¼-inch long
dark
spots about the size of a period—these are bedbug droppings
reddish
stains on your mattress from bugs that have been crushed
small,
pale yellow eggs, egg shells, and yellowish skins that young bedbugs shed
Once you
find a bedbug, put it in a sealed jar along with 1 teaspoon of rubbing alcohol.
Other types of bugs can look a lot like bedbugs. If you’re not sure what type
of bug you’ve found, bring it to an exterminator or entomologist to identify.
Step 2:
Contain the infestation
Once you
know you have bedbugs, you need to keep them contained so you can get rid of
them. A quick and easy way to trap bedbugs is with your vacuum. Run the vacuum
over any possible hiding places.
This
includes your:
bed
dresser
carpets
electronics
(like TVs)
Seal up the
vacuumed contents into a plastic bag and throw it away. Then thoroughly clean
out the vacuum.
Seal up all
your linens and affected clothes in plastic bags until you can wash them. Then
put them on the highest possible temperature setting in the washer and dryer.
If an item can’t be washed, put it in the dryer for 30 minutes at the highest
heat setting.
Anything
that can’t be treated in the washer and dryer, place in a plastic bag. Leave it
there for a few months, if possible, to make sure all the bugs die. If you
can’t clean furniture, throw it away. Tear it up first and spray paint the
words “bedbugs” on it so no one else tries to take it home.
Step 3: Prep
for bedbug treatment
Before you
start treating your home, do a little prep work to maximize your odds of
success. Make sure all your linens, carpets, drapes, clothing, and other hiding
places have been cleaned or thrown out (see Step 2).
Next, get
rid of bedbug hiding places. Pick up books, magazines, clothes, and anything
else that’s lying on your floor and under your bed. Throw out whatever you can.
Don’t move items from an infested room to a clean one—you could spread the
bugs.
Seal up any
open areas. Glue down loose wallpaper. Caulk cracks in furniture and around
baseboards. Tape up open electrical outlets. Finally, move your bed at least 6
inches away from the wall so bedbugs can’t climb on.
Step 4: Kill
the bedbugs
Home
cleaning methods
You can
first try to remove bedbugs without chemicals. These bugs are pretty easy to
kill with high heat, 115°F (46°C), or intense cold , 32°F(less than 0°C
Here are a
few ways to treat bedbugs using these methods:
Wash
bedding and clothes in hot water for 30 minutes. Then put them in a dryer on
the highest heat setting for 30 minutes.
Use
a steamer on mattresses, couches, and other places where bedbugs hide.
Pack
up infested items in black bags and leave them outside on a hot day (95
degrees) or in a closed car. In cooler temperatures, it can take two to five
months to kill sealed-up bugs.
Put
bags containing bedbugs in the freezer at 0°F (-17°C). Use a thermometer to
check the temperature. Leave them in there for at least four days.
Once you’ve
cleaned all visible bedbugs, make the area inhospitable for their friends.
Place bedbug-proof covers over your mattress and box spring. Zip these covers
up all the way. Bugs that are trapped inside will die, and new bugs won’t be
able to get in.
If these
methods don’t wipe out all the bugs, you may need to try an insecticide.
Using “Isolation” to Thwart Bed Bugs
In addition
to insecticides, PMPs have various non-chemical techniques available to them to
control bed bugs. Vacuuming, trapping, heat, cold and steam are important
components, especially in situations where bed bugs are showing signs of
resistance to insecticides.
There’s one
non-chemical tool, isolation, that you may be using or recommending without
even realizing it. If you can isolate or separate people from the bed bugs in
their homes, you will naturally reduce bed bug bites and reduce bed bug anxiety.
Isolating
the bed from bed bugs is especially important in infested apartments or
residential sites where infestations remain uncontrolled (for various reasons)
and people must live with bed bugs for the time being. Bed isolation can
provide a measure of relief.
COOPERATION
IS KEY. Isolation involves special manipulation of the bed or other sleeping
area so that bed bugs can’t reach sleeping people. Isolation methods require
the cooperation of your customer. Although you may show the customer initially
how to turn their bed into an isolation “island,” they will then be largely
responsible for maintaining the system. It’s a simple process, but it’s a
multi-step process. For that reason, it’s very important that you make sure
your customer understands the concept of bed isolation.
Explain to
your customer how bed bugs get to their hosts to feed. Some bed bugs are hiding
right in the bed, but more are hiding in cracks and crevices nearby, coming out
at night and making their way onto the bed. People make it easy for them to do
so by providing “bridges” that connect from the floor or wall or furniture
directly to the bed. Climbing right up the bed leg is probably the most common
way for bed bugs to reach their host. They also get onto beds by moving from draperies
that touch, or up bed skirts that reach the floor, or by climbing up from boxes
and other items stored under the bed.
The goal is
to make the bed an island that does not touch anything and nothing touches it.
The bed should not make any contact with the walls or floor other than through
the bed’s legs, which are sitting in the middle of their own islands,
moat-style interceptor traps. Anything that touches the floor and thus creates
a bridge, such as a bed skirt or bedspread, will provide a travel route for bed
bugs and destroy the protection.
Proper bed
isolation can offer almost immediate relief to residents at the beginning of a
bed bug control program. In some accounts, you may be constrained from
providing the level of bed bug control necessary to completely eliminate an
infestation, but you can still offer the possibility of a good night’s sleep to
bed bug-weary customers.
Bed Bug Control – How to Get Rid of Bed Bugs
Reduce
Clutter:
Remove all
personal items (stuffed animals, soft toys, blankets, electronics, etc) and
anything that does not stay in the room permanently. Caution: Be mindful that
items from the infested area can transfer bed bugs to other areas.
Launder
Infested Garments and Linens:
Infested
garments and bed linen cannot be treated with insecticide. They need to be
laundered in hot water (120 degrees fahrenheit minimum). If washing is not
available, heating the garments or bed linens for several minutes in a clothes
dryer may work.
Dismantle
Bed Frames:
Dismantling
bed frames in infested areas typically exposes bed bug hiding sites. Having
access to these areas during cleaning is important. Stand up the box spring and
shine a flashlight through the gauze fabric and look for bed bugs. If the
fabric is torn (possible hiding place), remove fabric to prepare for spraying.
Once covered with these encasements, bed bugs can not enter or exit. There is
no need to treat the mattress or box spring when using these encasements. Keep
them on for a year.
Remove
Dresser Drawers:
Remove
drawers from desks and dressers since bed bugs like to hide in these areas.
Turn furniture over to inspect and clean all hiding spots. All furniture should
be pulled away from the walls.
Clean the
Area
Scrub
infested surfaces with a stiff brush to dislodge eggs. Vacuum the room
extensively. Use a vacuum hose attachment to thoroughly vacuum cracks and
crevices on furniture and along baseboards on the walls. Vacuum along
baseboards, furniture, bed stands, rails, headboards, foot boards, bed seams,
tufts, buttons, edges of the bedding, as well as the edges of the carpets
(particularly along the tack strips). A good vacuum cleaning job may remove
particles from cracks and crevices to encourage greater insecticide
penetration. Bed bugs cling tightly to surfaces, so it is best to vacuum by
scraping the end of the vacuum attachment over the infested areas to pull out
the bed bugs. Caution: It is not good to use a bristle attachment, because you
may transfer bed bugs to other areas since they cling to the brush. Dispose of
vacuum cleaner bags after you are finished in an outdoor trashcan.
Caulk and
Seal
Caulk and
seal all holes where pipes and wires penetrate walls and floor, and fill cracks
around baseboards and molding to further reduce harboring areas.
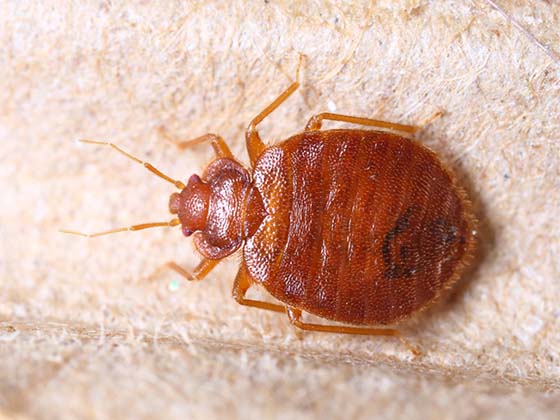
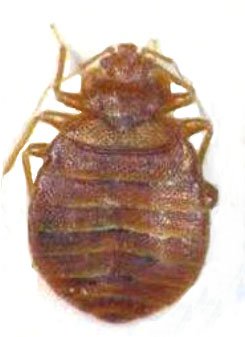
Bed Bug
Appearance
Tip: The
common Bed Bug can be seen with the naked eye. Since bed bugs are difficult to
see, use a magnifying glass.
Adult bed
bugs are brown to reddish-brown, oval-shaped, flattened, and about 1/4 to 5/8
inch long. Note: Their flat shape enables them to readily hide in most cracks
and crevices.
Tip: Eggs
are not placed on the host’s body (the person sleeping in the bed), but the
eggs are found on surfaces near where the host sleeps.
Bed Bug
Inspection Tips:
Look in any
place that offers darkness, isolation and protection to the bed bug.
Inspect
adjoining rooms where an infestation is found. Even when the bed bugs
themselves cannot be found, their hiding places can be located by looking for
the spots of fecal material they often leave.
Bed Bug
Inspection Check List
Inspect
these Areas:
The
Mattress and Box Spring
Bed
Frame and Head / Foot Boards
Other
Furniture
Walls
and Carpet
Electronics
and Appliances
The Mattress and Box Spring
Check the
mattress throughly, paying close attention to seams and tufts along the edges.
Flip the mattress over and inspect the bottom carefully as well. Pay particular
attention to any rips in the fabric. View the fabric on the bottom of the box
spring and shine a flash light to verify that bed bugs have not penetrated the
interior of the box spring.
Bed Frame
and Head and Foot Boards
Remove the
mattress and box frame from the bed frame and shine a flash light all along
every potential hiding place on the bed frame. Remember bed bugs can slip into
an crack a business card can fit into.
Other
Furniture: Desks, Chairs, Dressers, etc
Take out all
drawers and cushions from surrounding furniture. Check all seams and crevices
carefully with a flashlight. Take your time and inspect thoroughly. Bed Bugs
are commonly found in these areas in an infested room.