What Exactly Does an Event Planner Do? You’d Be Surprised
What exactly does an event planner do?
It’s an event planner’s job to ensure everything related to an event is taken care of, from idea conception to programming and day-of logistics. An event planner is charged with creating experiences and bringing visions to life, which means stirring multiple pots.
Meeting with clients, scouting locations, soliciting bids, managing vendor relationships and client communications, establishing and negotiating contracts, and managing budgets are all part of the drill, as are setting and managing clients’ and vendors’ expectations. It’s not always for the faint of heart
Some Desirable Characteristics Of An Event Planner Include:
Communication
Good communication is necessary to convince a prospective client to hire you. Both verbal and writing skills are of utmost importance to enable you to successfully get that client. Good writing skills come in handy for writing a proposal, as well as a good command of English to enable you to convey to your client why you are the right person for the job.
Financial Management
This has to do with creating the event to be in line with your client’s budget while taking care to ensure that the client is satisfied with your services. You have to be able to do the math as an event planner and work within the budget.
Negotiation Skills
This has to do with the ability to “cut-a-deal” while taking into consideration the client’s needs as regards the details. Working with many suppliers will make it necessary for you to be on top of your game when it comes to reaching a compromise that will make everyone happy.
Decision-Making Skills
For an event planner there are no ifs, buts or maybes, it’s either a strong yes or no. You have to be sure that you know, and are ready to make decisions which will give the event that spectacular effect according to the client’s taste.
Leadership
As an event planner, relationships with people are key. You will be working with people on your team, individual suppliers and others. You have to know how to make people enjoy working with you, thus you need to know how to relate with people on various levels. As a leader you have to inspire your team to put in their best by setting a good example so as to bring out the best in your team.
Organizational Skills
Events are all about getting things done the right way (detail-wise), and at the right time (which of course is before the event), and for this to happen you have to be on your “A-game” when it comes to organizing. This can only be possible if you are really good at prioritizing your workload efficiently to ensure that at the end of the
The purpose of your event
Why are you holding an event? You’d be surprised how many people think an event is a wonderful idea but when pressed on what the purpose of the event is, or its overall goal, they are unable to clearly articulate its objective. You want to make certain there is a clear mission and business reason to hold an event — a celebration for a new facility, a fundraising event with a clear financial goal behind it, a new product launch to share with customers — lacking a defined objective, your event can be a costly effort without the power to attract attendees or further your mission.
They’re good under pressure
Event planners are great at keeping calm under pressure. In stressful situations, they are able to find a solution and stay level-headed, no matter what. Since they’re used to people coming to them for answers, they’re able to think quick on their feet.
What Should You Do About The Contract?
Now, if your business – like most – is hiring an event planner on a contractual basis, then there’s a good chance you’ll be given a few papers to sign.
See, most event management firms have clients sign some sort of contract before they agree to work with them (and you should take it as a red flag if the planner or firm you’re hiring doesn’t have one). Pay close attention to whatever you’re being made to sign, and make absolutely certain that you read the fine print. Seek out a legal professional to go over the details with you – the event planner in question likely won’t take offense unless they’re trying to pull a fast one on you.
While you’re at it, make sure you’ve a clear concept of all the fees and terms of your working relationship with your event planner up front. Nothing makes a partnership go sour faster than having to pay a fee you weren’t aware of, or finding out a huge percentage of the profits will be siphoned away from your business. It’s all about due diligence here, really.
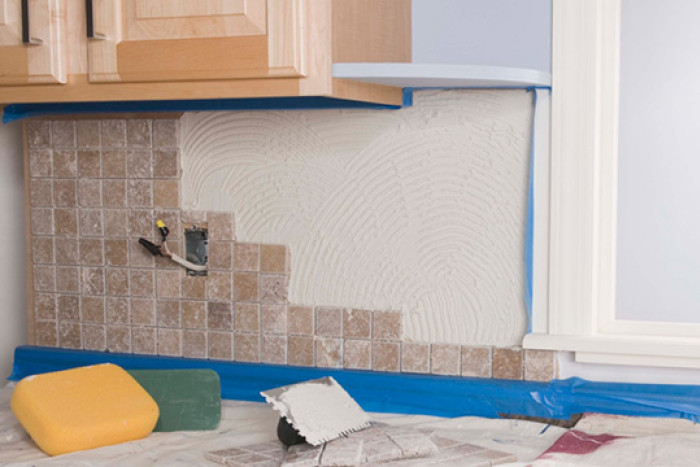
The Types of Vinyl Floors – All That You Need to Know
Like most flooring, the vinyl flooring comes in different shapes and sizes. The vinyl flooring comes in different kinds of vinyl sheet flooring, vinyl tile flooring, and vinyl plank flooring.
The vinyl sheet flooring – The vinyl sheet flooring is most suited or ideal for moisture-prone areas like bathrooms or mudrooms. Unlike the other flooring, the vinyl sheet flooring is expensive but is usually 6 to 12 feet, which makes it nearly seamless for vinyl installation at homes.
The vinyl plank flooring – vinyl plank flooring is very demanding almost for all house owners, as it has a great added and return value due to its durability and dirt resistant nature. Vinyl plank flooring imitates the look of hardwood . Vinyl plank flooring is relatively less expensive and the vinyl installation is so easy that vinyl plank floor can be installed directly above the sub floor.
The vinyl tile flooring – The vinyl tile flooring gives a look similar like that of marble or other classically tiled flooring. This type of vinyl installation is relatively easy and gives an attractive look to the new room.
Type of Vinyl
With new advances in the vinyl industry, there are several types of vinyl floors that will impact your decision when it comes to thickness and durability. There are basic LVT’s and there are new, engineered vinyls. Floors with an engineered rigid core construction will have a more dimensionally stable core than a standard LVT.
With the rigid core constructions, you can find floors from 4mm to 8mm+. Although a rigid core vinyl may be 4mm, it will have a solid construction, which differs from the bendable LVT. When it comes to a rigid core vinyl, thickness isn’t as much of a factor, since the core is constructed with durability in mind.
Type of Subfloor
Your subfloor is also a very important part of choosing the thickness as well. If you have an even concrete subfloor, you can get a thinner vinyl flooring. This is because your subfloor is sturdy enough that you don’t need the extra support. However, if you subfloor is a thin, creaking hardwood, you should opt for the thicker vinyl for added stability and support.
Vinyl Flooring Wear Layer
The durability of vinyl plank flooring is determined by the wear layer. When shopping for vinyl plank flooring, pay also attention to the wear layer. Just like the thickness, the thicker the wear layer, the more durable the floor will be. Make sure to choose features of the flooring that’s right for you and your application, using the same questions posed above.
The wear layer is the protective coating on top of the decorative layer of the vinyl flooring. The most popular is a urethane-based layer that protects the floor against scratches, stains, and scuff marks. The wear layer keeps the original look of the floor longer, providing a maintenance-free finish.
Styles of Vinyl Planks
Wood-Look Vinyl Planks
So you want vinyl planks that look like wood. Don’t worry, we’ve got plenty of options. Everyone wants the look of wood, without having to deal with the finicky nature of real wood.
Best yet, we have wood-look flooring that hits all the modern trends. Do you want gray floors? We got that. Do you want textured floors? We got that too. Dark wood or light wood? I think you know the answer.
Wood-look vinyl planks come in all the colors and finishes as real hardwood floors. If there’s a look you want, you’ll definitely find it
Stone-Look Vinyl Planks
Most people get stone-look flooring in tile format, but as ceramic plank flooring becomes more popular, I’m guessing we’ll be seeing more vinyl stone-look planks come into play.
Concrete, travertine, and slate are very popular when it comes to stone-look vinyl planks. Guess what? We totally have those looks too. Vinyl planks have a lot of those looks, in fact. From a light beige travertine to a dark gray slate, we got your stone-looks covered.
Vinyl Finishes
There are 3 types of finishes for vinyl flooring, all of which provide a beautiful end result.
Vinyl no-wax finish: This is the lightest type and is great for areas with light foot traffic and minimal exposure to dirt and moisture
Urethane finish: More durable, this finish is heavier and can stand up to moderate foot traffic and is also resistant to scuffing and easy to clean
Enhanced urethane finish: This is the toughest available and can accommodate the heaviest foot traffic, is highly resistant to scratches and stains, and enjoys a lasting luster without constant care
Vinyl Tiles and Planks – Super Easy to Install
If the idea of putting a huge roll of vinyl sheet into place seems a little daunting, then a better option might be to go for some luxury vinyl tiles or planks. Don’t be put off by the word ‘luxury’ you can still find some price friendly products.
Again, the technology has come a long way with these products, and you’re now able to get some very good looking vinyl tiles that are made to resemble real encaustic cement, porcelain or stone tiles for a fraction of the price!
Plus, you can make things super simple with the click-lock or peel and stick versions – easy to install, even for the novice DIYer, making your flooring project even cheaper.
Tips And Tricks For Upgrading Your Home Electrical System
The electricity requirements of electrical devices and appliances have changed considerably over the period of time. However, it is a fact that the electrical infrastructures of most of the homes have not been upgraded yet to meet this increasing demand. This has resulted in an increase in electrical load that later leads of safety issues in homes. Under such situation, it is imperative for the homeowners to make special arrangements in this regard. Seeking professional’s help is mandatory so that the certified profession can assess your home and determine if the home’s electrical system meets your family needs or not.
The amount of electricity a home needs is measured in amperes usually called amps. An ampere is a total amount of energy that flows through an appliance at a specific given time. According to a research, it was found that in past only 60 amp electrical services were required by the home owners to perform their daily chores. This has increased to hundred amps over the period of ten years. This is because of the new electrical appliances and devices being introduced in the market. When the home owners overburden their circuits, there is a high possibility of tripping a circuit breaker, overheating the wires in the walls and blowing a fuse.
ELECTRICAL UPGRADES YOU’LL WANT FOR YOUR HOME
Rewiring & Rerouting
Most room renovations include moving things around. For instance, you may re-conceptualize your entire kitchen and want the counter transferred to the other side of the room. While this may be a more aesthetically pleasing approach, your current electrical system may not be in a position to accommodate the move. Before you know it, you have to pull the counters back off the wall and make the adjustment. So make sure that there are actually wires behind the wall before you move your kitchen components, appliances, or electronics.
Modern Light Switch Features
When it comes to creating the right room atmosphere, lighting is everything. The right light can create energy or give you a soothing environment. Although the right type of light is important, light switches control them. So be sure you install a modern switch that makes controlling the lights easy. For instance, dimmer switches are very popular they allow just the right amount of light. There are many other options including 3-way, 4-way, sliders, different size switches, multi-locations, dimmers, and even remote control lighting. With all the options available, you never have to settle for boring light switches again!
Outlet and Receptacle Considerations
Receptacles and are like any other part of your electrical system. When installed, they must be safe and efficient. You may love the way a certain receptacle looks on your wall. The real question, however, is will it perform the way it’s supposed to. You’ve noticed that high-energy appliances use different receptacles, such as a specialized model for your washer or dryer. The reason for this is that these appliances require large amounts of power and need a certain type of receptacle that can accommodate it. When remodeling, get advice from a professional electrician in order to get the right outlets and light switches for the electronics and appliances in your room. There are several options and many of them come with great decorative features that put the finishing touches on your room.
Panel Upgrades
Today’s modern technology requires much more power than the older models. Although many manufacturers boast of energy efficiency, by comparison, they still utilize more energy. This is because of larger and more feature-packed washers and dryers, refrigerators, microwaves, dishwashers, and media-driven electronics and gadgets. Overall, the average household is using 30%-50% more energy than ever before. When remodeling any room in your home, consider how much energy it will utilize and whether or not your electrical system can handle it in a manner that is safe and efficient.
Powerful Electrical Upgrades
Electrical Upgrades for Your Circuit Breaker
Electrical wiring is not a job for most homeowners to tackle themselves, but it is a good idea to know a little about what will be required to bring your house up to speed when talking with your contractor.
One way to plan a new wiring project is to look in your main circuit breaker. Though some homeowners might be intimidated by their circuit breaker, most should easily be able to find the size of the service, and read the amp rating printed on it. In most cases, 100-amp service provides enough power to handle most loads. A service rated for 60-amps or less may need to be upgraded.
Look for open circuit breaker slots in the main circuit breaker panel. You will need one open slot for each 120-volt circuit that you may plan to install, and two slots for each 240-volt circuit. If your main circuit-breaker panel has no open breaker slots, you will need to have a sub panel installed.
Electrical Inspectors
Remember, all electrical wiring work requires review by your local electrical inspector to make sure the changes conform to local electrical and building codes. Failure to have proper permits and inspections can cause problems that can cost far more time and money than some homeowners (or unscrupulous contractors) may think they can save by doing work “under the table.” You could have trouble reselling your home in the future, or worse, your homeowners insurance could refuse to cover your loss in a house fire because the house was altered illegally!
What’s the Cost to Upgrade Your Electrical Service?
New Wiring: Open Your Walls (and Your Wallet)
To handle increased electrical loads, it’s likely you’ll also need to upgrade electrical wiring, especially if your house is more than 40 years old.
Upgrading your electrical wiring is a big job because the wires are located inside of walls, where they are difficult to get at without opening up walls. The price for a whole-house rewiring job–including opening up walls, running new wires, connecting switches, outlets and fixtures, and then repairing the mess–is $3,500 to $8,000 for an average-sized home.
For a larger home, or a house with restricted access to a crawlspace and exterior walls, the cost may reach $20,000 and more for labor and materials.
Not having enough power isn’t just an inconvenience — voltage drop-offs may actually damage sensitive electronics, so having plenty power is important to electrical home safety.
Even with enough power, you may need additional outlets to avoid relying on a tangle of power strips and extension cords — a potential safety hazard.
The Cost of Upgrading Electrical Service
The standard for household power used to be 60 amps. But modern homes may need as many as 200 amps to run air conditioners, computer equipment, high-definition televisions, and high-tech home automation devices.
The cost of upgrading your existing electrical service panel to a 100- or 200-amp panel is $800 to $3,000.
Home Electrical Upgrade Tips
If your home is 20 – 30 years old or more, there’s a good chance that your electrical system is being strained by the many new devices in use these days. It may be time to have a professional electrician take a look and see if an upgrade is needed.
Should an upgrade of your electrical system be advised, here are some tips to keep in mind.
Electrical re-wiring is not a job for most homeowners to tackle themselves. It’s a good idea, however, to know a little about what is needed before talking with your contractor.
A large electrical wiring project adds a considerable load to your main electrical service. In about 25 percent of all homes, some type of service upgrade is needed before new wiring can be installed. Some homeowners will need to replace an older 60-amp electrical service with a new service rated for 100 amps or more. A licensed electrician is needed for a job like this.
One way to plan a new wiring project is to look at your main circuit breaker. Though some people might be intimidated by their circuit breaker, most should be able to find the size of the service, and read the “amp rating” printed on it. A service rated for 60-amps or less may need to be upgraded. Normally, a 100-amp service provides enough power to handle most loads.
Look for open circuit breaker slots in the main circuit breaker panel. You will need one open slot for each 120-volt circuit that you may plan to install, and two slots for each 240-volt circuit. If your main circuit-breaker panel has no open breaker slots, you will need to have a sub panel installed.
If you need to run wiring under an existing walkway, try this trick: Dig a small trench on both sides. Next, flatten the end of a piece of rigid metal conduit and use a sledgehammer to drive the conduit, flattened end first, horizontally under the walkway. Then cut off the ends of the conduit with a hacksaw, file off the sharp edges and feed your wire through the conduit. A 10-ft. stick of rigid steel conduit (the thick, heavy-duty stuff) is inexpensive and available at home centers.
Buy the Right Transformer
A ‘low-voltage’ lighting system starts with a transformer plugged into a GFCI-protected receptacle. The transformer’s job is to convert 120-volt household current to 12 volts before sending it through special outdoor cable to light your fixtures. Just a few years ago, you would have needed a 600- to 1,200-watt transformer to light a yard full of halogen lamps. But because LEDs use fewer watts than their halogen predecessors, smaller transformers—45 to 300 watts—are usually all that’s needed.
You Can Keep Your Old Transformer
Any older low-voltage transformer can be used to power both halogen and LED lights—even if they’re mixed on the same circuit—as long as you have enough wattage to spare in your old transformer. If your transformer isn’t big enough to handle the additional load, add a second transformer or upsize your existing one.
Experiment with Clamp Lights
Before you buy anything, make a sketch of your deck or patio on graph paper (or use a program like Sketch-Up) and plan the location for each of your new light fixtures. To get an idea of the effect a fixture will give, pick up a clamp light—the kind with a metal reflector shade—and a few different types of lightbulbs with different brightnesses. Then, when it starts to get dark, try out the clamp light using different bulbs in a few different spots so you can observe their effect. Mark the most desirable locations on your drawing, and pay particular attention to lighting areas like stairs and transitions to different levels for safety.
Skip the Quick Connectors
Some landscape lighting kits have preinstalled quick connectors, but they aren’t what the pros use. Cheap connectors buried underground will work for a while, but they can corrode over time and fail. Cut off the factory-installed connectors and make splice connections using gelfilled wire connectors made specifically for outdoor use.
Tips for Safe Outdoor Lighting
Attach Holiday Lights With Non-Metal Non-Binding Materials
Be careful when you’re attaching temporary lighting strings and ornaments. Don’t use something that might damage the wires, and avoid anything with metal in it. Metal conducts electricity. Plastic cable ties are one popular and inexpensive choice for this task.
Install a Cover for Wet Locations in the Open
If your outdoor receptacle isn’t under a roof or some other protective cover it needs to have a special cover, known as an “in-use” cover, over it. As the name implies, these covers will keep the receptacle and the plug that’s in it, dry — even in the rain.
Install a Cover for Damp Locations Under a Roof
If you have an outdoor receptacle that’s on your porch or your screened-in patio or in some other location that’s protected from direct protection, then you can cover it with a “trap door” cover that will close, and keep it protected, when nothing is plugged into it — and it’s OK, then, to plug something into that receptacle and leave it there for a few days. These covers will be marked “Suitable For Damp Locations.”
Install GFCI Protection
GFCI, or Ground Fault Circuit Interrupter, protection is one of the most important electrical safety improvements of the last forty years. GFCI outlets should be installed in kitchens, bathrooms, garages, and even attics, crawl spaces, and unfinished basements. It’s required anywhere you might be plugging something in while you’re grounded. And that certainly includes when you’re standing out in the yard.
Install Weather-Resistant Receptacles
You should always plug temporary outdoor loads into outdoor receptacles, rather than running a cord out through a doorway or window from one of the receptacles inside your house, and those receptacles need to be weather-resistant. Even though they’ll have special outdoor covers over them, the receptacles themselves need to be able to take dampness, freezing, and heat without being damaged. They need to be rated as weather-resistant.
Outdoor lighting: A beginner’s guide
Start with task lighting
Once you’ve figured out your goals for outdoor lighting, task lighting should take priority. “For task lighting, it is important to illuminate pathways and entrances,” says Garcia.
“If your fixture is exposed to the elements, you will want to make sure to get a wet-rated fixture,” she says. “In many instances, a damp-rated light will work with a fully covered porch.”
Just make sure to stick to lighting that’s specifically identified as outdoor lighting—even if you are tempted by a cute indoor sconce.
Bright lights that wash a house or columns not only add drama, but also security, as outdoor lighting can be an enormous deterrent for would-be burglars, Wong explains.
There are loads of options that help boost security, from Wi-Fi-controlled LED light bulbs that can be controlled remotely to motion-sensor lights with distance and size controls.
It’s also important to bear in mind that lighting for security is all about location, primarily the front door, driveway, and garage. “If you are using spot lights/motion sensors, it’s best to position them in a location that does not bother you in the house or your neighbors,” Garcia says. “Install them during the day and adjust them at night to make sure they are not a burden on you or your neighbors.”
tips for effective outdoor lighting
Transformers and outdoor circuits. Choosing a starting point for your circuit is an important consideration when creating your plan. The further away a light is from a transformer (and the more lights in between), the dimmer it will be. Don’t overload a circuit with lights, try to keep it to a maximum of 100 watts on each line. Your transformer should be more than adequate to match your needs. Talk to your electrican first, but it’s better to buy one with more output than you need so you can add more later.
Less is more. Outdoor lighting is subtle art, used to illuminate paths, highlight trees and plants and for letting you know where a building is. It’s no use lighting up your backyard like a sports game. Use the right lights for the right job; there’s a different outdoor light for almost any feature you care to light up. Use underwater lights for ponds and fountains, small path lights for paths and tree-mounted spotlights (not too bright) for that hint of moonlight.
Be safe and aesthetically pleasing. Don’t simply run a lead from your lounge outside to a 4-way adapter and plug in four lamps. Outdoor lighting is designed just for that – outdoors. Electricity does not do well outdoors unless properly channelled, so make sure you’re wiring up your outdoor lighting by the book. Call on an electrician to help you out if need be.
Energy saving. Outside lights may seem like an extra expense reserved for the luxurious among us, but the cost can be minimal. Investigate different types of lighting.Solar power is a great resource for outdoor lighting. There are many cheap outdoor lamps with their own solar panels that charge during the day. This will cost you nothing but the initial cost of purchase. Of course, they will need to be placed in a sunny place. LED outdoor lighting uses much less energy than traditional light bulbs, plus they are more hardy, needing fewer replacements. Think about the layout of your garden and what areas require light and where shadows will fall. Making a plan of your garden will let you know exactly what’s needed to get the best out of your garden after-hours. Of course, the best way to save money is by not leaving your lights on all the time. You will only need outdoor lighting on the odd occasion, so keep it special and leave them off most of the time.
Long term considerations. Your outdoor lighting will need to handle all types of weather and seasons. When installing your lighting be sure you have a good idea of what changes your garden goes through, what plants will grow rapidly over the next few months, and what effect the lighting will have in each season. Your lighting becomes part of your garden, so treat it as such.
Must-Know Outdoor Lighting Tips
Include These Three Types.
Make sure to incorporate the three basic types of lighting: ambient, task, and accent. Ambient lighting can be achieved through hanging lights, post lights, and wall lights. Task lighting includes pathway lights, plus deck and security lights. And you can get accent outdoor lighting with landscape kits and spotlights. “For a small patio and a modest budget, consider string lights, solar spotlights, or LED candles,” Murphy says.
Calculate.
Before you start shopping, you’ll need to figure out exactly how much lighting you need. “To determine how much light a space requires, try this quick calculation: multiply the square footage of the area you want to light by 1.5 to get a rough estimate of the total wattage required,” he says. “For example, 100 square feet of space would require 150 watts.”
Plan Ahead When Choosing Fixtures.
Observe your space and take measurements so you don’t choose fixtures that are too large-scale. “Check the size and position of a fixture before you buy using a simple piece of paper,” Murphy says. “Use a paper template to determine exact placement to review the size before buying. For either the front porch or the back patio, the size of an outdoor wall light should be approximately one-third the height of the door.” You’ll also want to make sure you’re choosing sturdy lighting, one that’s made of high-quality and weather-resistant materials.
Use LEDs.
“They use far less energy than halogen or incandescent bulbs,” he says. “Plus, they are almost maintenance-free, so you won’t have to change bulbs.”
Take a Look From Inside Your Home.
This can help you decide on which lighting to choose and how place it around your yard. “Consider how patio spaces, gardens, and pathways look like from inside your home,” he says. “Lighting gardens or shrubbery that can be seen from living or dining rooms give a room-expanding view to the outside at night. Think path lighting for garden areas, or use solar outdoor lighting for a quick and easy style update.”
The biggest mistake people make is cleaning room by room (this is called “zone cleaning”). It’s much too slow! “You can either clean your kitchen in four hours, or clean your entire house top to bottom in four hours. “A lot of people get caught focusing on one area, doing a super job cleaning the counters—and never get to the stove, let alone the next room. In reality, just wiping things down and moving on is quick and efficient.”
HOW TO CLEAN HOUSE FAST!
Start at the Top
No matter what room you’re cleaning, clean from the top down so that dirt and dust from higher surfaces falls on lower surfaces that haven’t yet been cleaned. Dust ceiling fans, then furniture wiping dirt directly on the floor. Clean all of the floors as your last step to remove the dirt and dust.
Bedrooms-6 minutes per bedroom
Strip linens and remake beds. When making beds rather than hunch over tucking bottom sheets under the mattress use one hand to lift the cornerwhile tucking the sheet with the other.
Clear all clutter, if you’re in a hurry gather clutter in a spare basket or bin for later organization and tuck out of sight in a closet.
Wipe down furniture with a dusting spray and microfiber cloth, working top to bottom.
Bathrooms-7 minutes per bathroom
I like to clean all of my bathrooms at once-make a quick trip around all the bathrooms in the house to clear counters and spray counters and tubs with cleaner or white vinegar, allow to sit while you clean toilets and wipe down the outer toilet surface.
Go back and wipe down counters and rinse tub then clean mirrors.
Come back to clean the floors when cleaning the kitchen floor.
Living/Dining Rooms-7 minutes
Clear all clutter.
Starting in one corner of the room and working around dust all surfaces top to bottom. (If you have blinds and/or ceiling fans, dust those first.)
Use an upholstery attachment and vacuum upholstered furniture.
Vacuum floors along with all house carpeting as last cleaning step.
Kitchen-12 minutes
Load all dirty dishes in the dishwasher and fill sink with hot soapy water. If your stove top has removable burner pieces that need to be cleaned, place in water as well.
Clear counters.
Dunk sponge in hot water and squeeze out excess, wipe down cabinets, counters and other surfaces again working top to bottom. Rinse sponge in hot water as you clean-you’ll be amazed how much dirt comes off!
Wipe down appliances. (When you have more time consider doing this trick for preventing fingerprints on stainless steel!)
Finish cleaning any stove pieces and replace.
Clean floors last along with all hard flooring surfaces in the house.
Floors-15 minutes whole house
When vacuuming carpeted rooms work your way backwardsout of the room moving quickly and without too much overlap to save time. (I use this vacuum and have for 3 years now, it’s the best vacuum I’ve ever had, amazing at getting pet hair out of carpets, I highly recommend it!)
Vacuum, don’t sweep hard floors-use an attachment to get corners where dust and pet hair can accumulate. This helps prevent kicking dust into the air that will quickly settle again and aggravating allergies.
Steam mops or Hardwood Floor Cleaners (this is my favorite) also make cleaning hard surfaces much faster than traditional mops, so I highly recommend investing in one of those to keep your cleaning quick!
Tips :
If guests are going to spend more time in another area of your home, substitute it for the living area, and focus your time there.
Disposable cleaning wipes make a good quick helper, but you can also use an all-purpose spray and a cleaning cloth.
Once you’ve finsished your quick cleaning, and your guests arrive, don’t apologize for the state of your home. Guests come to see the host/hostess, not the house. Unexpected company, especially, will understand if everything isn’t perfect.
Enlist the help of children and/or spouse to make the quick cleanup go even faster. One silly thing my family does is to have “practice” sessions when we aren’t expecting anyone, to see if we can beat our best times.
Cleaning Supplies You Will Need
It will make your job simpler if you have quick access to everything you need. It is a good idea to use a storage caddy or a bucket with a handle so you can carry your supplies from room to room.
In your cleaning caddy you should have:
Sponge (with a scrubby side)
Cotton rags (I like cloth diapers or old terrycloth washcloths. Old t shirts make good rags too. If you use old towels or clothing, cut them up so it’s easy to tell that they have been retired.)
Microfiber cloths
Paper towels
Bathroom cleaner
Glass cleaner
Furniture polish
Rubber gloves
Floor cleaner and/or polish
The Best Ways to Make Your House Smell Good All the Time
Every home has a unique scent. Some houses — we hate to say it — smell better than others. While it may be tricky to keep day-to-day odors at bay, there are a number of ways that you can deodorize your space. Sure, some jobs like pet messes, musty mattresses, and overflowing trash bins require some elbow grease and patience. But generally speaking, it’s fairly easy to make your house smell good — especially if you follow these tried-and-tested tips from top interior designers.
Read more about other legal information and insights at our blog. If you find this information helpful and want to know more about legal options in your area we offer topic lists for easy searching.
Hiring a lawyer usually becomes necessary at low points in life. It can feel like the world is against you and making choices becomes difficult. Like in most things in life, the more you know, the better off you will be.
Make the Decision at Home
Which brings us to the final tip. Don’t make a final decision about which lawyer to go within the moment. Take a moment to think it over at home and come to a final decision.
This avoids feeling like you are being sold by a lawyer. This also shows a level of professionalism from the DUI lawyer. Anybody that needs an immediate response may be too much in a rush, and not thinking enough about your needs.
Comfort and Confidence
This question brings in that human touch the strongest. A DUI lawyer may be less confident in their ability to win the case but match your personality. They may be enthusiastic about your chances but rub you the wrong way.
How you appear in court can make a difference in the end result, so you want to hit a solid note on both of these. The result effects you the most, so make sure you feel right before committing to a lawyer.
Assessment of Case
Lay out the details of your case. Work honestly and bring all the paperwork you have access to. The lawyer can’t make a good recommendation on your chances if you are not honest.
This also gives you a good idea of how the lawyer views you and the case. A lawyer that seems disinterested in the details may be a bad fit for you.
Legal Fees
The most important question keeps more to the numbers than the personal interests. The best fit for you, unfortunately, starts with the fit that you can afford. While hiring a DUI lawyer will be cheaper than the expense of a conviction, you will still want to work within a budget to prevent further problems for you and your family.
TIPS TO CHOOSE A DUI ATTORNEY
Look for an aggressive attorney who will fight your case. While it is not a guarantee that you can win your case, hiring a professional DUI attorney allows you to maximize your chances of getting the best possible result. Your attorney should be ready to file pretrial motions to prepare for a jury trial, to seek a dismissal or to put you in a better negotiating position.
Look for a DUI lawyer who is also experienced in DMV defense. Most DUI arrest will result in a driver’s license being confiscated by the arresting officer and issuance of a DMV form, titled, DS 367. Based on this form, the DMV can hold a hearing that can result in a driver’s license suspension.
How involved is your attorney in your case: There are attorney who will be hired by a client and never look at the file, preferring instead to delegate the case to another attorney. We take personal interest in each case and fight each case with zelous advocacy.
The number of DUI cases and trials attorney handled. Experience does matter and an attorney who handled numerous DUI trials and DUI cases will be better positioned to fight your case and get better deals or results at motions and trials.
The cost of the attorney: In selecting the attorney you can overpay an attorney and underpay. You can pay too much for services and you can also pay an attorney too little to get any qualify efforts from her or him. By keeping our overhead low, we are able to provide quality representation at affordable price.
Tips For Choosing The Right DUI Lawyer
Consider your situation. Before you start looking for an attorney, make sure you understand the charges against you, consider your game plan, and set a budget. Each of these will be important when choosing an attorney. Choosing an attorney whose practice is devoted entirely, or at least primarily, to criminal defense is essential because you don’t want an attorney who spends the majority of his/her time reviewing contracts to represent you in a criminal prosecution. Even better, look for an attorney who has a practice that is focused even more narrowly on DUI cases. Also, consider how you wish to resolve your case – plea agreement or trial because some defense attorneys have a reputation for negotiating great plea agreements while others almost always go to trial so it is important to consider which direction you are inclined to go with your case. Finally, there can be a fairly wide range of fees charged by attorneys. Usually, although not always, the disparity in fees reflects the disparity in experience. While this is not the time to shop for bargains, you do need to know how much you can afford to pay an attorney before you set out to hire one.
Ask friends, family members, and co-workers for a referral. Understandably, you may be reluctant to discuss your situation with people you know. Being arrested and charged with a crime is usually not something people are excited about sharing with others. You might be surprised, however, at how many people you know have either been arrested for driving under the influence themselves or had a close loved one who was. The reality is that being arrested for a DUI is just not that shocking, or uncommon, in the United States. A referral offers you first-hand information about an attorney. It isn’t just the positive feedback that can be helpful either. Sometimes, the negative experiences people you know had with the attorney can be just as helpful as the positive feedback.
Contact local and state Bar associations. Bar associations frequently offer lawyer referral services that can be searched using a variety of helpful criteria such as the lawyer’s practice areas, geographic location, even languages spoken. For residents of Omaha or he surrounding area, the Omaha Bar Association is a good place to start. The Nebraska Bar Association’s “Find a Lawyer” program is another good resource.
Search the internet. Choosing an attorney based solely on the attorney’s website is never a good idea; however, you can obtain a wealth of information by searching the internet for a Nebraska criminal defense attorney. You will likely find an attorney’s biography, the areas of the law the attorney practices, and how long the lawyer has been in practice, among other helpful information. Sometimes an attorney’s bio instantly resonates with a client, ultimately resulting in a successful attorney-client relationship.
Schedule consultations. Most Nebraska criminal defense attorneys will offer a free, or low cost, initial consultation. Once you have a short list of potential attorneys, schedule initial consultations with them to discuss your case. Be sure to prepare for the meetings by gathering documents and making copies for the attorney, preparing questions you have for the attorneys, and preparing yourself to answer some tough questions the attorney may have for you. By the time you are done with your consultations you should be ready to choose an attorney for your case.
Tips For Hiring The Best DUI Lawyer
Make Your Decision When You Have Time To Think About It
Much like a hiring manager might know during an interview when they found a promising employee, your instincts might kick in during one consultation or phone call and let you know that you have found your DUI lawyer or attorney. Still, it’s best not to make this decision at the moment. Tell any lawyer that you talk to that you need to think things over for yourself at home before you reach a final decision. Any lawyer or attorney who is not trying to oversell you and is an actual professional will respect and understand this. Anyone who says they need an immediate answer from you is likely rushing their work too much, and/or not considering your own needs enough to be trusted enough to represent you.
Narrow Down Your List Based On Comfort And Confidence
It’s simple enough to look up lists of possible lawyers qualified on paper to handle your case, and your consultations and interviews should narrow down who the real contenders are. However, you still need to pick one above all else, and this is more subjective than objective. This comes down to their confidence and how comfortable you are with them.
You might find a DUI attorney that doesn’t seem very confident about winning your case, but they suit your personality well. On the other hand, you might find someone very optimistic about winning for you, but you see them grating. You need to find someone that suits you both ways since your appearance as a team in court will go a long way towards good results for you, be it a trial or a plea bargain.
Consider The Firm Size
Even though you’re looking for a DUI lawyer for you, the size of the firm behind anyone’s lawyer can matter much. You’re more likely to have representation in all matters and hearings, and there will be more time and attention put into your case. It’s also more likely that the firm will have someone with good standing with any law enforcement or prosecutors involved in your case so that there won’t be prejudice or lack of professionalism that hurts your case.
Always Tell The Truth
The documents might not tell your potential attorney everything that they need to know. Be prepared to answer questions, and be honest when you do. Hold nothing back; otherwise, you might not get an accurate assessment of how your case is likely to go.
Part of the reason you want to hire an attorney is that they not only know the law but how to speak to other legal professionals, like prosecutors, district attorneys, and judges, about legal matters. Still, you will likely need to know specific terms that you might encounter. DUI is an acronym for driving under the influence, but your state might also use DWI, which means driving while intoxicated. Some states even use OWI for operating while intoxicated or OVI for operating a vehicle while intoxicated.
Take Advantage Of Free Consultations
DUI laws are a complex field, and always in a state of flux. Given that every case is a unique thing, the very facts can vary drastically in any situation. This is why you need a DUI attorney who can assess both the strengths and weaknesses of your case.
The majority of DUI lawyers offer free consultations to potential clients. Others might charge a nominal fee, but it can still be money that’s well worth it.
Phone interviews can be a good starter round, but for anyone you might get serious about using, you should meet in person face to face if you can.
Do note that some attorneys might have you meet with a member of their office staff rather than them. Good lawyers can be quite busy.
To prepare for consultations, you need first to make sure you have the necessary documents assembled and with you. That includes court documents spelling out your charges and court date, your bail papers, and if possible, the police report itself. You also need to add the search inventory report and other documents provided to you by the police, and the names of anyone connected directly to your DUI case, such as victims and/or witnesses.
HOW TO CHOOSE A GOOD DUI LAWYER
AFFORDABILITY
One of the important things that you have to be careful with when hiring a lawyer is to make sure that you hire one that you can actually afford. In order to avoid having to deal with a situation where you cannot pay the lawyer, you have to first ask him how much does he charge.
Not every expensive lawyer is good, you have to keep that in mind. That means that you can find some good ones that are actually quite affordable and who are able to deal with dui penalties that you are charged with.
However, to find that more affordable one who is actually good, you have to do a very careful research. The easiest way would be if someone from your friends recommends you a lawyer that they have been hiring.
That way you know for sure that you can completely trust that lawyer and you know that he is good. You have to keep in mind that you should always ask questions in order to know more about the lawyer and his experience. This way if you don’t like what you hear, you don’t have to hire him.
REPUTATION
Definitely, the first thing that you want to follow when searching for a good DUI lawyer is the reputation. If you have ever wondered how to find a good DUI lawyer, we will give you all the information that you need. People never think about having a lawyer ready at all times, they go searching for one when it is time to deal with the issue. Depending on the penalty you are facing, you might not have a lot of time to spend on searching, so you better be prepared at all times and find yourself one now.
If you want to hire a good DUI lawyer, you have to ask other people and search online to see if they have a good reputation or not. This way you can easily point out which lawyer is good or not. This method will save you a lot of time, money and stress.
Working with an inexperienced lawyer is never a good thing because he will not be able to fix your problem fast as some other more experience one, and with lawyers, time is money, so you will end up spending much more money than you initially expected.
Longevity, energy efficiency and a lower environmental impact are just some of the benefits of choosing a metal roof.
Although the initial cost of a metal roof is more than traditional asphalt, so is its lifespan. Metal roofs can last 30 to 50 years longer than other roofing materials, saving you money in the long-term. ) Plus, cool-metal roofing uses a reflective solar coating designed to minimize heat buildup and reduce air conditioning costs. (Another money-saver!)
Every year, about 13.2 million tons of asphalt roofing shingle waste is generated across the United States; making metal an environmentally friendly option to consider. They are also 100% recyclable and are made with a minimum of 25% recycled material, depending on the type of metal.
WHAT ROOFING MATERIAL SHOULD I PICK?
Metal roofs can be manufactured from a variety of metals and alloys including steel, aluminum, copper, zinc and terne (zinc-tin alloy).
Steel:
There are three variations of steel: galvanized, galvalume, and weathering steel (corten). Steel is one of the most common metal roof materials.One reason for its popularity is the varying color options, high strength, low weight and long-term durability. These can allow for a variety of looks to complement your home.
Compared to other metal, steel is typically less expensive. Depending upon the thickness, color, and quality of the desired panels, pricing could range anywhere from $75 to $250 per roofing square (100 square feet).
Steel roofs do have a downside, though. If your home is located along the coast and exposed to salt spray, you may want to rule out galvanized steel – it could corrode in such conditions.
Aluminum:
Aluminum is typically more expensive than steel, but also comes with more resistance. Aluminum sheet metal is very lightweight and easy for a contractor to form and install. Even though aluminum is a thinner and lighter material, it’s still very durable and can replicate the strength of much thicker metals.
One of the biggest selling points of an aluminum roof is the fact that it doesn’t have red rust and corrosion is generally minimal as it ages. Studies have even shown that aluminum can work great in coastal areas with high rainfall and seawater spray conditions. However, aluminum is typically a thinner material and therefore more prone to denting.
Copper:
Copper is long-lasting, known to last up to 100 years. It is very soft, which makes it a quieter option, think heavy rain downpour! However, copper is expensive and over time acquires a greenish patina. Some people find that attractive, but others don’t like the transitioning hues.
Zinc:
Zinc actually possesses its own outer protective layer, which prevents against corrosion, scratching and panel markings. If wind or another element were to scratch the surface of the zinc roof, the metal’s protective layer would actually fix and correct itself over time. Zinc roofs have been known to last anywhere from 60 to 100 years.
How to Repair a Hole in a Metal Roof System
Clean the repair area:
The first step in the repair of any metal roofing material will involve cleaning the surface. A hole in a metal roof system can be caused by any number of sources—the hole may be from deterioration and rust, or it may be from something falling onto the roof surface, such as a large branch. No matter what the cause of the hole, the area around the hole is most likely dirty and will require cleaning.
Thoroughly clean the surface of the metal panel using Simple Green or another cleaner, until the surface of the roof panels is completely free of any dirt, film, and algae growth. Any cleaner residue will compromise the integrity of the roof repair.
After cleaning the surface of the metal panel, use a wire brush to scuff the surface where the repair will be made. Scuffing the surface will help the sealant bond to the metal. Use the wire brush only in the area to be patched; wire brushing beyond that may remove the protective coating from the metal panel surface, causing later deterioration.
Measure the repair area and cut a patch:
Cut the chosen sheet metal to a size that matches the area to be patched. The sheet metal patch should overlap onto the metal panel at least two inches past the edges of the damaged area. After the sheet metal patch has been cut and fit to size, round the corners of the patch with a file or emery cloth to prevent any sharp corners from becoming a catching spot for snow or ice.
Once the patch has been measured, place it over the hole being repaired. Take a pencil and outline the patch onto the roofing. Remove the patch and examine the outline to make sure the patch will overlap by at least 2 inches in all directions past the edges of the damaged area.
Install the repair patch:
Apply the color-matched urethane sealant to the surface of the metal panel being repaired, staying just inside the marked pencil line. Apply the sealant liberally in the area, so that there are no gaps or voids at the leading edge of the patch.
Press the patch into place over the damaged area. The sealant should squeeze out from the leading edge of the patch along all sides. If there are areas where the sealant is not oozing, these are areas where moisture may later penetrate under the patch, causing a deterioration of the patch. Apply a little more sealant here to eliminate any gaps.
Variation: holes in raised roofing seams:
If the hole or damage to the roof is in the raised seam between panels rather than in the flat area of a panel, patch it with an asphalt impregnated glass-membrane fabric over the damaged portion of the seam itself. On raised-seam roofs, it is important that the individual panels be allowed to move along the seams, so never attach a metal patch that is anchored to both roofing panels over the seam. Instead, repair the damage to the seam with narrow strips of membrane fabric confined to the raised seam section. The patching strip should overlap the damaged area by at least 2 inches. Over the top of the patching strip, apply a coating of urethane sealant, then another patching strip. Done correctly, both roofing panels will still be able to move independently.
Secure the patch:
Once the patch has been pressed in place, attach it to the surface of the metal roof panel, using pan-head sheet metal screws. Space the screws every three to four inches around the perimeter of the patch. The screws should be applied within one inch of the edges of the patch so that they apply uniform pressure to the edges and to the sealant beneath the patch. The screws should be only long enough to secure the patch to the underlying roofing panel. Never screw the patch down through the roofing panels and into the roof decking or rafters.
As necessary after the patch has been attached, retool any sealant that is bleeding from the edge of the patch, using a putty knife. This will ensure that the sealant properly seals the edges of the patch and prevents moisture from penetrating.
Paint the patch to match the roof:
If desired, the surface of the patch can be painted to match the color of the metal roof panels. To do this, lightly wire-brush the surface of the metal patch and the metal panel just past the edges of the patch. Paint over the surface of the patch and onto the surface of the underlying panel. It may be necessary to wait for the sealant to cure before it will accept paint. Also, confirm that the paint is compatible with the sealant you used.
Safety Considerations
Safety is a major concern when completing any roof repair project. A hole in a roof system may indicate that there are other concerns about the overall structure, including decking deterioration. Be sure to conduct a proper under-deck safety review and roof analysis before attempting to complete this or any roof repair. If there are concerns about completing your roof repair safely, contact a professional roofing contractor who can complete the repair for you in a safe and professional manner.
Metal Roofing Drawbacks
Though metal roofing offers many pluses, a few drawbacks are worthy of mention. For the most part, metal roofing manufacturers have improved their products to address or solve many of these concerns:
Metal Roof Cost.
The biggest drawback is initial cost. Metal roofing is equivalent in cost to other premium materials—from about $150 to $600 per square (100 square feet).
Because of the material’s long-term durability, the trick is that you ultimately save the difference (and more) if you stay in the house for a long time and, of course, you save on seasonal maintenance. Then again, if you plan to move in a couple of years, you probably won’t get the return on your investment.
Noise.
For some, the sound of rain tapping on the roof is romantic and homey. For others, it’s like living inside a drum. In a rainstorm or hailstorm, living beneath thin sheets of metal is bound to be noisier than living beneath thick slate or tile. Noise can be controlled both by using materials that have structural barriers to minimize the drumming effect and by applying them over sound-deadening insulation and solid plywood sheathing.
Denting.
Just as your car will dent if a golf ball hits it, a metal roof can dent if large hailstones fall on it. Copper and aluminum roofing, much softer than steel, are more prone to denting. Some types are guaranteed not to dent, however.
Though you shouldn’t have to walk on a roof that doesn’t leak, there may be occasions when a plumber needs to snake out a vent pipe or a chimney sweep needs access to the flue. You can walk on some metal roofs but not all of them. This depends on how the particular product is made and the type of construction supporting it. As you might imagine, metal can be very slippery when wet.
Marring & care.
Some painted metal roof finishes can peel, chip, fade, scratch, or chalk, although nearly all are guaranteed for 30 years. Walking on some types, particularly those with a granulated-stone surface, may cause wear.
Installers must be careful not to scratch or dent the roofing during installation, and panels must be treated with care. Unlike conventional roofing, some metal shingle systems are installed from the top down, eliminating the need to walk on them. Once installed, you may need to hose off roofing now and then to keep it looking good.
Leaking.
A metal roof must be installed correctly. Roofs with exposed fasteners are particularly vulnerable to improper installation. If screws attach through the flat surfaces (rather than the raised ridges), rain water can run down the roof and seep into the screw holes. For this reason, special resilient washes must seal around screw heads. If you install this type of roof, be sure manufacturer’s instructions are followed precisely.
Expansion & contraction.
Because metal expands and contracts as it warms and cools, most new products have fastening systems that accommodate movement. Otherwise, fasteners that secure the roofing may tend to come loose. Expansion and contraction on hot days can cause a wavy affect.
Modifications.
Metal roofing materials installed in large panels are more difficult to replace if damaged than individual shingles. Also, if you remodel or add on to your home 10 or 20 years from now, it may be difficult to match the material.
Lightning.
Many people assume that because metal conducts electricity, it also attracts it. This really isn’t the case, and many instances have been documented where lightning has struck trees or other high objects located near metal roofs rather than the roofs themselves. Just the same, metal roofs can be easily grounded by a lightning protection company.
House fire.
Though metal roofs are good at guarding against a fire that approaches from outside a house (such as from flying sparks and embers), they are not ideal for fires that start inside a house. With a serious house fire, firemen may need to cut through the roof to put out the fire—this job can be much more difficult and take longer if the house is capped with a metal roof.
What’s involved in how to install metal roofing
A steel roof is a lifetime investment, lasting 50 years or more if it’s a good one. Asphalt roofs typically last 20 to 30 years, depending on the installation and shingle quality. So, the investment might be worth it, but the range of choices makes shopping for a steel roofing system more complicated than you might think.
If you want to install steel over asphalt, your best choice for installing metal roofing is to use a steel shingle system like the one shown instead of the more common (and more expensive) standing seam steel. In a standing seam roof, long, single panels run vertically all the way from the eave to the ridge. In contrast, steel shingles are small panels installed in horizontal rows much like other shingles.
Better steel shingle systems, like the one shown, install over a framework of 2x2s. This framework has three big advantages. First, because the frame is screwed directly to the rafters and the interlocked shingles are screwed to the frame, the roof can withstand winds of up to 120 mph without damage. Second, the frame creates a flat and straight surface even when the shingles are badly curled or the roof ridge is bowed.
Finally, the frame creates a ventilation gap that helps prevent ice dams in the winter and cools the roof and the house in the summer. To vent the roof, holes are cut in the old roof (Detail 1) above the soffit, which pulls air through the soffit vents underneath. Cool outside air then travels under the shingles to the vented ridge (Detail 2), pulling out moisture and heat.
What causes condensation on metal panels?
When temperature and humidity conditions reach dew point, moisture can condense on the underside of metal roofing and potentially cause water damage to the inside of your customer’s building. Those drips from ceilings and surface moisture occur when warm air comes in contact with the cooler roofline or walls.
High interior humidity—a common cause of condensation in metal buildings—can result from heating and air conditioning systems, how the building is used, gas-fired heating components, improper construction techniques or even human respiration, as these all give off moisture vapor.
Effects of condensation on different types of panels:
If there is an abundance of condensation, water droplets will form and can cause damage. In metal buildings, there are a few possible consequences of trapped moisture in wall and roof systems:
Corrosion of metal components, even on surface-treated metal: When exposed to moisture, metal components can oxidize and weaken, decreasing the life of your customer’s building.
Degradation/ reduced effectiveness of the thermal performance of insulation
Mold or mildew growth, which can cause unpleasant odors and increase health risks, particularly for those with allergies or asthma
Insect infestations
Note: The probability of significant problems will depend on the location and usage of your customer’s building.
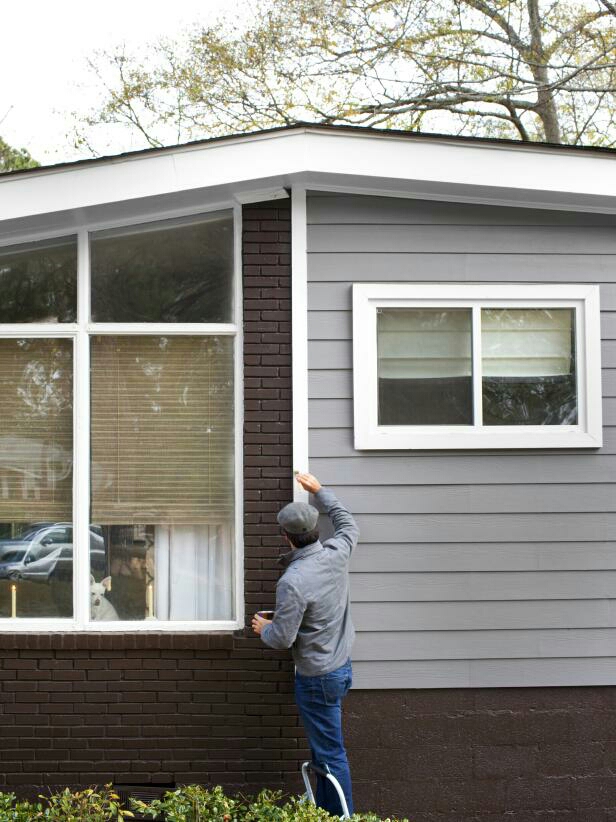
Give your house a fresh, updated look with exterior paint.
Materials Needed:
exterior flat or eggshell paint
exterior semigloss paint
pressure washer
paint sprayer
paintbrush
painter’s tape
drop cloths
ladder
paint scraper
stain-blocking primer
epoxy filler
medium-grit sanding block
spackle knife
exterior caulk
caulk gun
plastic sheeting
Step 1: Pressure-Wash Walls
To ensure best coverage, remove dirt and dust buildup from house using a pressure washer. TIP: Work your way from top to bottom of house in a smooth, controlled manner, overlapping each stroke by 8 inches.
Step 2: Repair Damaged Surfaces
Walk around entire perimeter of house taking note of damaged surfaces such as: wood, masonry, metal, siding or stucco. Apply epoxy filler to cracks or holes using spackle knife. Once dry, lightly sand using medium-grit sanding block.
Step 3: Remove Loose Paint
Once exterior is dry, walk around perimeter of house taking note of any loose or chipped paint. Place drop cloths along ground, then remove chipped and loose paint using paint scraper or medium-grit sanding block.
Step 4: Caulk Trim
Fill any gaps between house and trim around doors and windows using exterior caulk and caulk gun. If house has mixed materials such as siding and brick, add caulk along surface where different materials meet.
Step 5: Prime Stains
Examine exterior for any stains or visible wood knots. Apply one coat of stain-blocking primer to area using paintbrush.
Step 6: Protect Doors, Windows and Lights
Cover doors, windows and lighting fixtures using plastic sheeting and painter’s tape.
Step 7: Paint Exterior
Load flat or eggshell exterior paint color into paint sprayer. Depending on intensity of hue, apply one or two coats of flat or eggshell exterior paint to entire house. Be sure to work your way from top to bottom in a smooth, controlled manner, overlapping each stroke by 8 inches. TIP: When changing exterior color from light to dark or dark to light, start with a coat of primer to ensure proper coverage. Primer is not necessary when a fresh coat of existing color is being applied.
Step 8: Paint Trim and Doors
Remove plastic sheeting from doors, windows and lighting fixtures. Add two coats of exterior semigloss paint color to woodwork and doors using paintbrush. Remove drop cloths.
10 Things You Must Know When Painting a House Exterior
From choosing the right paint to prepping your home’s exterior, we’ve got the best tips to make exterior painting a breeze.
Consider Mother Nature
Plan ahead when painting. The time of year is key, so understand your local weather patterns. Select a dry time of year when there is little rain and lower humidity. Paint needs time to dry and will not adhere to surfaces that are not dry.
Quality Over Price
Better quality paint means you will paint fewer times over the years, and you’ll get better coverage when you do paint. Paint technology has improved dramatically in the past few years, with colors guaranteed to last longer than ever before. You may be tempted to skimp on paint to save money up front with a cheaper brand, but you’re bound to have trouble and eventually pay more in the long run.
Sand and Wash
Paint won’t adhere very well to dirty or rough surfaces, so be sure to clean the siding and trim thoroughly, allow to dry, and sand. Be sure to sand (or scrape as needed) any peeling paint to create a solid surface for the paint to adhere.
Paint Doesn’t Stick to Rotten Siding
Rotten wood and siding material are nearly worthless to paint, as they will do nothing but to continue to deteriorate. You have a couple of options. Replace the siding or wood trim with new components, or in the case of small areas, use a wood hardener and match with an exterior filler product, such as a wood filler. Be sure to prep and sand either one prior to painting.
Use Primer
The rule of thumb has always been to apply a good coat of primer, sand, then apply your color coats. This is still a good rule to follow, but new paint technologies have combined primer and paint into one product, which manufacturers assert will cut down on the number of coats you will have to apply. This newer paint is more expensive, but may be comparable to the purchase of separate primer and paint. Look at reviews of these newer paints, particular from folks that have used it in your area.
Combine Cans of Paint
Mixing multiple cans of the same color of paint into a larger container, such as a five-gallon bucket, will help ensure a uniform color is applied to your home’s exterior. This step, called boxing the paint, is a method the pros follow. This step is important if, for example, you initially bought a gallon or two of paint less than you needed and then picked up the extra gallons at a later time.
Paint From Top to Bottom
Starting at the top and working your way down while painting helps control streaks, as you will be working with gravity rather than against it. Drips are inevitable, but this method will allow you to feather out mishaps in the direction you are working.
Seal It Off
Properly close your paint containers with their lids after you finish for the day to keep the paint from drying out. Use a rubber mallet to lightly hammer the lid shut. You can also add a plastic wrap film over the opening to ensure a tight seal.
Add Grit
Painted porches (particularly steps) and other painted floors can become a bit too slick with a coat of paint alone, so add a little bit of fine sand to the paint to add traction. You can use play sand or additives that manufacturers have begun producing to provide this extra texture.
Prep The Landscape
It’s easy to forget how messy painting can be, so be sure to cover the ground, bushes and any other vegetation below the area you are painting. Also move or cover up any outdoor furniture, hoses, grills, etc. Use drop cloths and weigh them down on the corners or securely wrap them around the items you are protecting.
10 Inspiring Exterior House Paint Color Ideas
From clean whites and pleasing neutrals to cool blues and vibrant reds, exterior paint colors are your home’s calling card to the world. Calibrate the color right and you’ll have a house exterior that welcomes visitors when they roll up to your home. More importantly, the right exterior color will give you joy every time you return home, for years to come.
01.Waterfront Blues
A Twin Cities builder of high-end properties, Hendel Homes chose a spot-on perfect blue for the exterior of this waterfront cottage. The combination of blue and white offers a lively yet traditional look.
02.Desert Oasis
Like an artist coordinating all elements of a painting, a house color consultant draws in many aspects of a home before choosing the final colors. Designer and color consultant Kimberly Laten, from Color Design LLC, expertly gauged the tan intensity of this Arizona home’s stucco exterior based on many factors, including the dazzling blue desert sky and white clouds, lush green lawn, and earthy olive-green succulents.
03.Farmhouse Charm
If your dream is a white farmhouse-style home, follow the lead of Wendy Durnwald of the lifestyle blog, Life on the Shady Grove. For her “pretend farmhouse,” as she puts it, Wendy sought out an elegant white that would steer clear of sterile and dull. After all, for an active property filled with five children and many sheep, things are not boring at all. She chose a soft, warm, and rich white exterior paint color: Sherwin-Williams Roman Column.
04.Beautified Brick
When home blogger Traci and husband Cy were tasked with the job of reviving a home exterior in Nashville, they knew the first order of business was to brighten up the brick. They began with the Sherwin-Williams color Balanced Beige (SW7037) and had a local Lowe’s store shade it down to a darker, friendlier beige color. The turquoise door (Sherwin-Williams Reflecting Pool) in semi-gloss plays well with the beige paint and the dark natural wood shutters.
05.Craftsman Green
When you have a gorgeous, sprawling Craftsman style home set in the woods, you’ll want an exterior paint color that works with, not against, your surroundings. The green color of this sustainable home, from Asheville architects ACM Design PA, works in perfect harmony with the lush surrounding trees as well as with the manufactured stone veneer apron and crisp white trim.
06.Timeless Contrast
Without a doubt, it’s a look that rarely goes wrong. When you have a traditionally styled home with plenty of trim and other details, you best serve that home aesthetically when you increase the contrast between the trim and the field color. For the broad white trim of this new-construction home, Illinois-based JB Architecture wisely shaded down the field color’s gray to emphasize its difference from the white trim.
07.Tudor Bold
Tudor-style home exterior paint jobs are characterized by one thing: dark trim against a lighter field wall color. Heidi Nyline of Warline Painting, in Vancouver, British Columbia, notes that these browns and blacks are a shout-out to the Tudor’s historical past when the trim was made of natural wood that had been oiled and darkened over time. What really wins the game, though, is the zesty red front door that beckons owners and visitors alike to visit this gorgeous property.
08.Cottage Blue
Can you balance blues, whites, and reds on a home exterior without going the full-on patriotic red, white, and blue route? Taylor Cabot, a Portland, Oregon architect, did just that with his 1923 cottage. Saying that he most decidedly “did not want the house to look like an American flag,” he went with a deeper, shadier blue for the main body of the house. The red, too, was not a bright patriotic red but, like the blue, was shaded down into a darker maroon.
09.Embrace Brown
As a professional color consultant who has appeared on HGTV, Ken Roginski knows all about colors. And his advice to homeowners who avoid brown is to not be afraid of darker colors. Brightening the trim dials up the contrast with the brown paint, producing a classic effect that’s very easy on the eyes much like this Florida home.
10.Red Punch
Vibrant red exterior paint graces this townhouse from Motion Space Architecture + Design bordering a wetland. This home’s color ramps up the vitality with a stately brick-red that stands boldly against a backdrop of drizzly Seattle skies
Top Exterior House Color Schemes
Gray
Trending both inside and out is gray in all shades. Depending on what you choose for your siding, it can be complemented by different accent colors. A light gray home looks great with black and white accents, making it a look that will never go out of style. While dark gray really pops with white accents on your trim and shutters, with a yellow or blue front door. This is a hot color scheme that will be in style for a long time.
Beige
If you’re looking to stay neutral, beige is a great exterior home color. This can be paired with white accents along with the trim, shutters and front door for a clean look. It’s a look that will never go out of style and is great if you’re looking to sell your home.
However, if you’d like to add a little color to your home’s exterior, red makes a great accent color for the front door, railings and more.
Brown
Dark brown is often associated with a rustic home look. It’s warm and inviting, with the right colors. Against a dark brown, a tan or light brown works well as an accent neutral. For an accent hue, dark green or deep red make great choices here as well. However, stained wood front doors, railings and other exterior elements will really help complete this rustic look.
White
Some homeowners tend to shy away from white as an exterior home color because it can get dirty. However, it actually gives off a clean and elegant style for your home. Accent colors can be fun to play with here because white makes for the perfect canvas for anything to stand out. Black and white are always a combination that will go together but, have you considered a black, white and gray home?
On a white home, the color of your front door will really stand out from the rest. So, if you like to play with color, this could be the perfect color for your exterior siding.
Green
Light, sage green is the new up-and-coming color for home exteriors. If you’re looking for a non-neutral but not ready to take a bold step into one of the brighter hues, this is the color for you. Paired with gray and white, it’s a great color scheme to introduce to your home.
Navy Blue
Another bold color look that’s becoming more popular is navy blue. Paired with a white accent and for a bit of a bolder look, a red front door, it is sure to make your home stand out in a wonderful way on your block.
Red
For homeowners who want a bold look, red is the way to go. Of course, it should be complimented by plenty of accent neutrals to even out the look. White and dark gray perfectly compliment a red home to make it warm and welcoming.
Priming Your Home’s Exterior Before Painting
On most unpainted exterior surfaces, the standard procedure calls for a primer coat followed by two topcoats of paint. This procedure is also recommended for any painted surface that requires significant scraping and repairs. However, you may be topcoating only because the surface is dull or because you want a new color. If that’s the case and the existing paint is sound, a single coat of “one-coat” acrylic latex paint applied properly offers adequate protection and coverage in lieu of the two topcoats.
You can apply quality latex paint over any oil- or latex-painted surface that’s in good shape. If the paint is sound, you generally need to prime only scraped or repaired areas. You can also use a stain-blocking primer in lieu of regular primer to seal knots in board siding or trim and to cover stains that you can’t remove, such as rust.
If you’re applying latex paint over a glossy paint, play it safe and prime the entire house, even if you’ve sanded or treated the existing finish with a deglosser. Hardboard siding may also require a primer. As a general rule, use an alkyd primer and a latex topcoat when repainting.
Be sure that your primer is appropriate for the surface you’re painting. Cedar and redwood, for example, usually require an oil-based primer to seal the surface so that tannin stains don’t bleed through the topcoat. Also make sure that the primer and topcoat are compatible. How do you know? By telling your supplier what you’re painting, reading the label, and (though not always necessary) using the same brand of primer and topcoat. To make it easier for a colored topcoat to cover primer, have your paint dealer tint the primer to the approximate color of the finish coat.
If you already have three or more coats of oil-based paint on the house, use oil-based house paint.
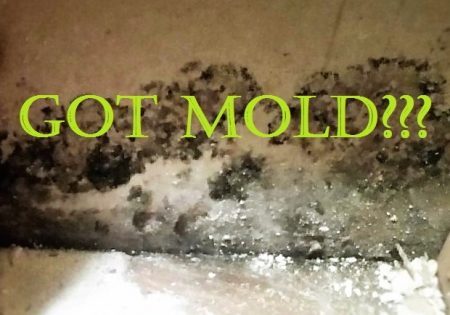
DANGERS OF MOLD AND HOW MOLD REMEDIATION CAN ELIMINATE THOSE DANGERS
There are many who are not aware of what mold is. Mold is a type of fungus. It is normally displayed in an array of colors such as blue and greens. Normally mold grows in areas where there is a high abundance of moisture that cannot be controlled.
Mold can grow on almost anything including wood, food, plants, walls, and ceilings. Mold reproduces by releasing a large population of spores. The spores can withstand extreme temperatures and are very enduring.
Dealing with mold can be tough because when breathed in or direct contact with it can cause health complications. This is why there are masks and remediation kits designed to deal with mold problems and reduce the threat of health complications.
Studies have shown that even people who are healthy can become affected by mold. One of the most common problems with mold exposure is allergic reactions. Other problems have been linked to the following:
Respiratory
Asthma
Respiratory system failure
Remediation is the clean up and the elimination of mold. Mold is toxic and should be removed whenever it is observed no matter if it is in the home, outside of the home, or in a business. There are professional mold removal specialists that can help.
Mold is developed in areas where there is moisture present. The most common areas for mold are the bathroom, basement, and kitchen as these are areas that deal with water. Mold has been known to grow within 24-48 hours of the moisture buildup.
There are many different types of mold found in homes. In fact, there are more than 100 different kinds of mold. Some of the most common types of mold found in homes are:
Alternaria
Botrytis
Penicillium
Stachybotrys Chartarum
If there is confusion about the type of mold growing in the home, there are mold inspections that can be done by professionals. Inspectors know what to look for and where. There are plenty of reasons to be concerned about the type of mold that’s growing in the home. These and many others are benefits of a mold inspection:
Eliminates smell of mold in home
Rids walls and ceiling of bacteria
Peace of mind
Detects leakage problems
A mold inspection comes in two stages; the first one is the collection of samples. The second one is to determine the species of mold. This will give the experts an idea about the toxicity level of the mold and how to effectively remove it.
Remediation is done on a professional level. Mold needs to be removed through special equipment. Most people think that using chemicals on it will eliminate it, but bleach and other cleaners will not kill off the mold or prevent it from growing.
Mold removal can be done in the areas where it is seen and also in nearby areas. Mold grows very fast therefore spreading quickly. Once mold spores have gotten into the air, they are normally spreads throughout from the HVAC system.
When mold has developed inside of the ductwork to a HVAC system, there is professional ductwork cleaning services available to take on all sorts of mold colonies. Professionals are highly recommended at this level of remediation.
Mold remediation experts usually take advantage of state of the art equipment using high velocity air scrubbers. This helps to remove the mold out of the air. Also, special heap vacuums are used to catch small and large spores.
Black mold is the deadliest form of mold there is. It is unhealthy for all age groups to be exposed to. In some cases, there are groups of people that are more sensitive to black mold as these groups of people have weaker immune systems:
Seniors
Children
Pregnant women
Mold should never be handled by someone that does not have experience around it. Direct contact with it can result in dry, red, irritated skin. It may feel like a burning sensation and medical attention may be needed.
Over half of the homes in the United States have mold problems. Inspections along with remediation specialists should be taken advantage of in these situations. Mold remediation can prevent health problems and creates a healthier living environment for all to enjoy.
4 Signs That You Need Mold Remediation
Mold may be present in your home and affecting your life even if no actual mold is visible. Here are four things that may indicate you need mold remediation.
The general rule is that when mold is visible, it is time to kill it and remove it. But mold isn’t always visible and so there are other criteria to strongly consider when it comes to mold remediation. Here are the four criteria to look for mold in your home.
A water event or occasional/frequent water intrusion
Has there been recent water intrusion? Water does not necessarily equal mold growth as spores have to already be present. But since mold spores are microscopic (2-10 microns), a water event is usually the trigger that causes mold to be seen or otherwise detected.
Note: Mold means moisture or humidity is, or has been present. Water does not necessarily mean mold growth is present.
Discoloration
Most molds cause the organic material the mold is consuming to change colors. Whether the food source for the mold is human food or drywall paper, if colonization is allowed for enough time, there will usually be a discoloration that will reveal a mold problem.
Most molds, when allowed to grow in abundance, are visibly seen in certain colors. Mold is not only black. Many species are visible in gray, white, brown, red and even some hues of pastel colors. Some molds look like dust, or fuzz, while others look like sand granules. Certain molds thrive on certain food sources, and they all require different moisture content or relative humidity in the ambient air.
Note: Water seeping through masonry sometimes causes a white crystalline, powder-like discoloration called “efflorescence”. This substance is made up of minerals and should not be confused with mold.
A musty odor
Is there a musty odor that prevails, or come and goes? Some molds are odorous when colonizing. Although some species do not cause odors, when a musty, moldy odor is combined with other criteria, one can conclude that mold is present. Even if mold is not visible, remediation may be necessary.
Note: Some individuals have a great sense of smell. Others may think that they do. Odor alone should not be the only criterion used to determine whether remediation is necessary. Some actively colonizing fungal species give off odors. Dead or dormant spores generally do not, but are just as detrimental to human health. Absence of odor does not mean that there is no mold and odor does not mean that it is caused from fungal growth. Do not rely solely on scent for detection.
Adverse human health effects
A good indication that there is “unacceptable fungal ecology” within a building envelope is that occupants feel health symptoms when spending extended periods of time in a certain space and feel much better when spending extended periods of time outside that space. If residents in a home or employees in a workplace experience congestion, allergy symptoms, headaches, fatigue or respiratory problems after each night’s sleep or after the end of each work day, this may be an indication of unhealthy air quality.
One environmental hazard to cause unhealthy air quality is a mold infestation. If one spends a week on vacation away from work and home and all symptoms disappear, perhaps the home, school or workplace has unacceptable fungal ecology or unhealthy indoor air quality
What is performed with a Mold Remediation Protocol?
Interview – Review and discussion with an authorized representative of the Property of current conditions which has led to the claim.
Site Assessment – A physical site assessment of the Property in the area(s) of concern to: visually assess the damage(s), retrieve temperature and RH readings, take air and direct samples for mold (if applicable), and gather room dimension to create room/floor drawings to identify the location(s) of concern.
Air Sampling – The purpose of non-viable spore trap air sampling is to provide an approximation of the airborne microbial (fungal) spore concentrations. A minimum of one control sample is typically taken outside the most common used entrance into the building, then one or more air samples are collected in the areas of concern within the building. Elevated airborne spore concentrations may indicate an indoor microbial reservoir(s), or that cleaning of personal effects or the HVAC system(s), is a necessary component of a microbial remediation plan.
Direct sampling – The purpose of direct sampling is to identify the type and concentration of microbial spores present on affected materials identified with suspect visible microbial growth. The sampling results are also used for reference for source contamination when air samples are taken.
Non-Scope Items – include visual identification and records review for:
Asbestos Containing Building Materials (ACM)
Lead-Based Paint
Fire Reduction Chemicals
Qualifications: No federal guidelines exist at this time. However, some States have placed requirements for licensed Mold Assessors and Mold Remediators. For those States that do not have specific requirements, it is recommended that you use a person who:
Has taken a minimum of 24 hours of mold assessment and remediation courses,
Follows one of more of the recognized industry guidance and practices, and
Acquires, at a minimum, 8 Continuing Educational Units (CEUs) bi-annually.
What Happens During Mold Remediation
No one likes surprises when having any kind of work done in one’s home. It is a disruptive situation no matter what the project. In the case of mold remediation, you are going to have strangers in your home in “other worldly” outfits using serious chemicals. You will feel much less stressed if you know just what the mold remediation company’s MO is.
Firstly, you have a few things to do before the remediation crew arrives:
Fix the water problem that caused the mold. Mold remediation is an involved and costly process. You don’t want to have to do it all over again.
Clear a path for the crew to move easily from the outside to the mold area and back. For instance, remove cars from the driveway and garage.
Keep pets out of the way—in a room with the door closed, in the yard if the crew won’t be working there.
The mold remediation company parks the truck as close to the house as possible, lays plastic sheeting down and runs hoses from the doorway to the mold area (unless they can access the mold area from outside of the home, such as in the case of a crawlspace).
The mold remediation workers suit up: head-to-toe white suits, booties, respirators and goggles. They do this on every job, toxic mold or non-toxic. They then spray the mold area with an EPA-approved biocide (mold killer). The workers leave while the biocide does its thing.
The next day, the mold remediation crew returns, puts down plastic and suits up. They then spray the mold area with an encapsulant, a type of paint or whitewash that encloses (as if in a capsule) any mold spores that remain. They should spray well beyond the treated area to eliminate any chance of mold growth. For example, the whole attic should be sprayed even if the mold is confined to one spot. Tip: Confirm that the company’s procedure includes this before you sign the contract.
Next, the crews cleans the air with an HEPA (High Efficiency Particular Air) air scrubber and an air exchange that replaces moldy air with clean, fresh air. The final step is using an HEPA vacuum to clean the floor or any surface that can be vacuumed to remove stubborn spores that linger.
Mold remediation usually includes disposal of moldy porous building materials (drywall, insulation, etc.) and cleaning and disinfecting carpet and personal items if they can be saved.
Have a post-remediation inspection done to ensure that the remediation was performed properly. The company that did your initial mold inspection and testing can take care of that.
How to Keep Mold from Coming Back
Fortunately for homeowners who’ve recently undergone mold remediation, there are preventive measures that you can take to help keep mold from growing back. Here are some proactive steps that you can take to keep mold away for good:
Identify areas where there’s a moisture problem, and correct it. Basements and other areas prone to moist air can benefit immensely from the presence of a dehumidifier. For low-lying areas, sump pumps provide an additional line of protection by removing excess water automatically. Take note of any moisture you notice in your home. This can include dark spots on ceilings that indicate a leaky roof, or musty smells inside a closet. Fixing water leaks and replacing decaying wood can go a long way toward keeping your home free of unwanted fungi.
Dry wet areas as soon as possible. If water gets into your home, remove it as soon as possible. For example, if you have water in your basement from a burst plumbing pipe or a heavy rainstorm, dry out the area immediately, before there’s time for mold to take root. Even seemingly mundane things, like leaving wet clothes in the washer for a few days, can be an invitation for mold.
Keep out moisture with proper ventilation. Appliances that produce moisture, like clothes dryers and stoves, should vent outside. You should check your AC unit periodically to make sure it’s not generating moisture. If it’s leaking, dripping, or the coils are covered in condensate, you probably need to call an HVAC repair service.
Use mold-resistant building materials whenever possible. This may not be possible in already existing homes, but if you’re remodeling, building an addition, or building a custom home, it’s a good way to stay one step ahead of mold. There are newer varieties of drywall and Sheetrock that are paperless– instead of gypsum covered with paper, they use fiberglass instead. This creates a highly water-resistant surface, and mold cannot break down and metabolize it. This is especially useful in bathrooms, kitchens, laundry rooms, and other areas where moisture is pretty much a given.
Keep your indoor humidity between 30 and 60 percent. If your home is humid, and you notice a lot of water condensing near windows and pipes, consider using dehumidifiers.
Have you
discovered bed bugs in your home or have bites from bed bugs? A treatment by a
professional pest control company or exterminator may not be in your budget or
work with your schedule.
Luckily, it
is possible to treat a bed bug infestation yourself without spending a fortune.
You must be diligent and committed to the treatment process, but you can
eliminate bed bugs yourself! Read our guide below for the 4-step DIY bed bug
treatment process.
STEP 1: Preparing
a Room for Bed Bug Treatment
Before you
begin your own bed bug treatment, you will need to prepare the room or rooms
where bed bugs have been found, in addition to rooms that share walls with the
infested rooms. Remove any items in the room that you absolutely cannot treat
or that have already been treated. Cover items that will be removed from the
room in plastic bags before moving to the next room to prevent any unseen bed bug
from infesting another room.
Remove any
paintings or art from the walls. Be sure to thoroughly check any item that is
removed from the room to prevent bed bugs from being transferred from room to
room.
If you have
a mattress that is heavily infested, we recommend covering it with a bed bug
proof mattress cover or bed bug mattress encasement before moving. You will
also need to cover your box spring with a box spring encasement.
If your
mattress needs to be disposed of and replaced, be sure to cover the mattress
with plastic before disposing to protect sanitation workers. Labeling a
mattress or covering with “Bed Bugs” is also helpful.
Infested
sheets, linens, and garments should be washed and then dried in a household
dryer on high heat (over 120 degrees F), as the heat will kill bed bugs. Any
garments that cannot be washed may need to be dry-cleaned or discarded as
insecticides cannot be used on these materials.
If stuffed
animals, books, or soft toys are infested, place those items in an air-tight
bin along with vapor strips to kill the bed bugs.
STEP 2: Treat
the Cracks, Crevices, Tufts, and Folds of Your Home for Bed Bugs
Some bed bug
products cannot be used where others can. Also, bed bugs can build up a
resistance to certain pyrethroids, making them difficult to treat. This is why
using a variety of products to kill and control bed bugs will produce the best
results. We recommend using one of our bed bug kits. These kits include our
most powerful and effective products for a variety of applications to save you
time and money.
STEP 3: Treat
Your Mattress for Bed Bugs
To get rid
of bed bugs in a mattress, use an aerosol spray labeled for bed bug treatment,
such as Bedlam Aerosol Spray, and spray or mist the insecticide onto the
mattress. Focus on the seams, tufts, and folds of the mattress and spray until
the mattress is damp. Allow mattress to dry before remaking the bed with
freshly laundered sheets that have been run through a dryer on high heat.
After
treating a mattress or box spring for bed bugs, we recommend encasing each in a
bed bug proof cover. This will prevent re-infestation and will make future
inspections and treatments easier. Be sure any product that has been sprayed or
applied to your mattress is dry before you cover the mattress with a bed bug
proof cover. You can make the bed with your freshly laundered linens over a bed
bug proof mattress cover.
After
encasing, you will not need to re-treat your mattress or box spring further. If
you are not encasing your mattress or box spring, you will need to reapply the
aerosol spray every 7-10 days until you do not see any further bed bug
activity.
You can follow
the initial aerosol spray treatment with an insecticide dust. Dusts are great
for hard to reach areas like the corners of mattresses and where mattresses and
box springs meet. Dusts also last for several months.
Don’t forget
to dust your box spring as well. Remove the dust cover from the bottom of the
box spring and dust in corners and crevices.
Again, we
highly recommend encasing your mattress and box spring to avoid having to
re-treat.
Characteristics of Bed Bugs
To continue
cycles of mating and egg production, males and females must feed (consume a
bloodmeal) once every 14 days. With regular feeding, a female can lay 1-3 eggs
daily and 200-500 eggs in her lifetime. Should a bed bug’s regular feeding be
interrupted, however, it can still survive for several months on one meal.
Bed bugs are
not known to travel large distances on their own. However, they will attach
themselves to movable objects such as bedding, boxes, clothing, and furniture.
Besides residences, bed bugs are known to inhabit a variety of interior
settings like offices, stores, hotels, and gyms.
Step 1:
Determine the Severity of the Problem
Determine
Severity
Most bed
bugs are found within eight feet of a place where a human is resting. But as
their population grows, so does their footprint in your home. That’s why it’s
important to check the following areas:
Mattresses,
box springs, and bedding
In
curtains and behind peeling wallpaper
Under
carpet
Cracks
in furniture and in hardwood floors
Piles
of clothing
With your
flashlight and credit card, search and probe crevices to check for bed bugs. If
you see these pests moving, capture them with adhesive tape. Wipe the area with
soapy water to clean away any dead bed bugs, droppings, eggs, and shed skins.
Also consider vacuuming the area for an even deeper cleaning.
If you have
one or more rooms with substantial clutter or items strewn about, you’re
providing bed bugs with a haven. The simple act of reducing clutter deprives
these pests of breeding areas. But if you can see bed bugs, black or brown
stains that indicate droppings, or if you experience bites, you’re likely
dealing with an infestation.
Step 2:
Build a Plan to Stop Further Infestation
Build A Plan
With their
ability to hide, their tiny size, and their frequent reproduction, you may find
it challenging to remove bed bugs from your home. Making matters worse, the egg
stage of a bed bug’s life is actually quite resistant to many forms of
treatment. Recognize that ridding your home of these pests make take a number
of steps.
Step 3: Take
Action to Eliminate the Bed Bugs
Take Action
Your DIY
tactics will play an important role in evicting pests. Experts suggest the
following tasks to clean rooms, wipe out bed bug homes, and discourage their
spread:
De-clutter
rooms of your house or apartment
Buy
a mattress encasement to protect your mattress and box spring
Vacuum
multiple times each week as you fend off the pests
Wash
and dry your clothes at the hottest setting (at least 120 degrees) to kill any
bed bugs
Apply
caulk to cracks and crevices seen in walls and door frames
Contact
a pest control specialist if signs of infestation continue
Step 4:
Check Your Results
Check Your
Results
Give your
efforts a full week to take effect. This should be enough time in case any eggs
were missed during cleaning. If the results are not to your liking, contact a
pest control specialist. The infestation may require an insecticide, which is
best handled and deployed by a professional.
Bed Bugs and
Humans
Remember
that bed bugs are not known to carry diseases to humans. But our exposed areas
of skin – the hands, neck, face, leg, and arms – are open targets to bed bugs
when we sleep.
You may not
even be aware of a bed bug bite since these are not known to be painful. In
fact, hours or days may pass before you notice signs like swelling, bleeding,
or secondary infection at the site(s) on your skin if the bites are not
cleaned. This reaction is more likely in small children, the elderly, and
people with weakened immune systems.
Weather and
Seasonal Behavior of Bed Bugs
Higher
temperatures are a bed bug’s ally for a few reasons. First, heat quickens the
pest’s life cycle. In everything from feeding to the maturing of eggs to
general movement, hotter days are a bed bug’s comfort zone.
This means
that your home is potentially a prime habitat for bed bugs throughout the year.
Because winter temperatures are extremely uncomfortable to bed bugs – and sends
them into a dormant state called diapause – they will always seek a warmer
environment. The controlled climate of your home provides a setting where they
can be active all year. If the clothes we wear carry these pests, then we help
them reach new sites for infestation. This means that controlling and
eliminating bed bugs can be done at any time on the calendar.
Removing bedbugs
Bedbugs
measure just 5 millimeters across—smaller than a pencil eraser. These bugs are
smart, tough, and they reproduce quickly. Bedbugs know where to hide to avoid
detection, they can live for months between meals, and a healthy female can lay
500 eggs in her lifetime.
No surprise
that these tiny bloodsuckers can wreak a lot of havoc in your home. If they get
into bed with you, they can leave red, itchy welts all over your body.
Fortunately,
you can get rid of bedbugs. Be patient as removing bedbugs often takes some
time and effort. You may have to try a few different chemical and non-chemical
approaches, especially if you have a large infestation.
Certain
factors can make bedbugs harder to remove. You may have a tougher time ridding
your home of them if you have a lot of clutter, or you travel often and bring
new bedbugs home in your luggage.
If you can’t
rid your home on your own, you may have to call in a professional exterminator.
Read on for a step-by-step guide on getting rid of bedbugs.
Step 1:
Identify all infested areas
If you’ve
got bedbugs, you want to find them early before they start to reproduce. It’s
much easier—and cheaper—to treat a small infestation than a big one. Yet
smaller infestations can be harder to detect.
Search for
bedbugs yourself, or hire a professional to do an inspection. Some inspectors
use specially trained dogs to hunt down bedbugs by scent.
Bedbugs’
small, narrow bodies enable them to squeeze into tiny spots—like the seams of a
mattress or couch, and the folds of curtains.
Also look
for them in places like these:
near
the tags of the mattress and box spring
in
cracks in the bed frame and headboard
in
baseboards
between
couch cushions
in
furniture joints
inside
electrical outlets
under
loose wallpaper
underneath
paintings and posters on the walls
in
the seam where the wallpaper and ceiling meet
Use a
flashlight and magnifying glass to go over all of these areas.
You can spot
bedbugs by these signs:
live
bedbugs, which are reddish and about ¼-inch long
dark
spots about the size of a period—these are bedbug droppings
reddish
stains on your mattress from bugs that have been crushed
small,
pale yellow eggs, egg shells, and yellowish skins that young bedbugs shed
Once you
find a bedbug, put it in a sealed jar along with 1 teaspoon of rubbing alcohol.
Other types of bugs can look a lot like bedbugs. If you’re not sure what type
of bug you’ve found, bring it to an exterminator or entomologist to identify.
Step 2:
Contain the infestation
Once you
know you have bedbugs, you need to keep them contained so you can get rid of
them. A quick and easy way to trap bedbugs is with your vacuum. Run the vacuum
over any possible hiding places.
This
includes your:
bed
dresser
carpets
electronics
(like TVs)
Seal up the
vacuumed contents into a plastic bag and throw it away. Then thoroughly clean
out the vacuum.
Seal up all
your linens and affected clothes in plastic bags until you can wash them. Then
put them on the highest possible temperature setting in the washer and dryer.
If an item can’t be washed, put it in the dryer for 30 minutes at the highest
heat setting.
Anything
that can’t be treated in the washer and dryer, place in a plastic bag. Leave it
there for a few months, if possible, to make sure all the bugs die. If you
can’t clean furniture, throw it away. Tear it up first and spray paint the
words “bedbugs” on it so no one else tries to take it home.
Step 3: Prep
for bedbug treatment
Before you
start treating your home, do a little prep work to maximize your odds of
success. Make sure all your linens, carpets, drapes, clothing, and other hiding
places have been cleaned or thrown out (see Step 2).
Next, get
rid of bedbug hiding places. Pick up books, magazines, clothes, and anything
else that’s lying on your floor and under your bed. Throw out whatever you can.
Don’t move items from an infested room to a clean one—you could spread the
bugs.
Seal up any
open areas. Glue down loose wallpaper. Caulk cracks in furniture and around
baseboards. Tape up open electrical outlets. Finally, move your bed at least 6
inches away from the wall so bedbugs can’t climb on.
Step 4: Kill
the bedbugs
Home
cleaning methods
You can
first try to remove bedbugs without chemicals. These bugs are pretty easy to
kill with high heat, 115°F (46°C), or intense cold , 32°F(less than 0°C
Here are a
few ways to treat bedbugs using these methods:
Wash
bedding and clothes in hot water for 30 minutes. Then put them in a dryer on
the highest heat setting for 30 minutes.
Use
a steamer on mattresses, couches, and other places where bedbugs hide.
Pack
up infested items in black bags and leave them outside on a hot day (95
degrees) or in a closed car. In cooler temperatures, it can take two to five
months to kill sealed-up bugs.
Put
bags containing bedbugs in the freezer at 0°F (-17°C). Use a thermometer to
check the temperature. Leave them in there for at least four days.
Once you’ve
cleaned all visible bedbugs, make the area inhospitable for their friends.
Place bedbug-proof covers over your mattress and box spring. Zip these covers
up all the way. Bugs that are trapped inside will die, and new bugs won’t be
able to get in.
If these
methods don’t wipe out all the bugs, you may need to try an insecticide.
Using “Isolation” to Thwart Bed Bugs
In addition
to insecticides, PMPs have various non-chemical techniques available to them to
control bed bugs. Vacuuming, trapping, heat, cold and steam are important
components, especially in situations where bed bugs are showing signs of
resistance to insecticides.
There’s one
non-chemical tool, isolation, that you may be using or recommending without
even realizing it. If you can isolate or separate people from the bed bugs in
their homes, you will naturally reduce bed bug bites and reduce bed bug anxiety.
Isolating
the bed from bed bugs is especially important in infested apartments or
residential sites where infestations remain uncontrolled (for various reasons)
and people must live with bed bugs for the time being. Bed isolation can
provide a measure of relief.
COOPERATION
IS KEY. Isolation involves special manipulation of the bed or other sleeping
area so that bed bugs can’t reach sleeping people. Isolation methods require
the cooperation of your customer. Although you may show the customer initially
how to turn their bed into an isolation “island,” they will then be largely
responsible for maintaining the system. It’s a simple process, but it’s a
multi-step process. For that reason, it’s very important that you make sure
your customer understands the concept of bed isolation.
Explain to
your customer how bed bugs get to their hosts to feed. Some bed bugs are hiding
right in the bed, but more are hiding in cracks and crevices nearby, coming out
at night and making their way onto the bed. People make it easy for them to do
so by providing “bridges” that connect from the floor or wall or furniture
directly to the bed. Climbing right up the bed leg is probably the most common
way for bed bugs to reach their host. They also get onto beds by moving from draperies
that touch, or up bed skirts that reach the floor, or by climbing up from boxes
and other items stored under the bed.
The goal is
to make the bed an island that does not touch anything and nothing touches it.
The bed should not make any contact with the walls or floor other than through
the bed’s legs, which are sitting in the middle of their own islands,
moat-style interceptor traps. Anything that touches the floor and thus creates
a bridge, such as a bed skirt or bedspread, will provide a travel route for bed
bugs and destroy the protection.
Proper bed
isolation can offer almost immediate relief to residents at the beginning of a
bed bug control program. In some accounts, you may be constrained from
providing the level of bed bug control necessary to completely eliminate an
infestation, but you can still offer the possibility of a good night’s sleep to
bed bug-weary customers.
Bed Bug Control – How to Get Rid of Bed Bugs
Reduce
Clutter:
Remove all
personal items (stuffed animals, soft toys, blankets, electronics, etc) and
anything that does not stay in the room permanently. Caution: Be mindful that
items from the infested area can transfer bed bugs to other areas.
Launder
Infested Garments and Linens:
Infested
garments and bed linen cannot be treated with insecticide. They need to be
laundered in hot water (120 degrees fahrenheit minimum). If washing is not
available, heating the garments or bed linens for several minutes in a clothes
dryer may work.
Dismantle
Bed Frames:
Dismantling
bed frames in infested areas typically exposes bed bug hiding sites. Having
access to these areas during cleaning is important. Stand up the box spring and
shine a flashlight through the gauze fabric and look for bed bugs. If the
fabric is torn (possible hiding place), remove fabric to prepare for spraying.
Once covered with these encasements, bed bugs can not enter or exit. There is
no need to treat the mattress or box spring when using these encasements. Keep
them on for a year.
Remove
Dresser Drawers:
Remove
drawers from desks and dressers since bed bugs like to hide in these areas.
Turn furniture over to inspect and clean all hiding spots. All furniture should
be pulled away from the walls.
Clean the
Area
Scrub
infested surfaces with a stiff brush to dislodge eggs. Vacuum the room
extensively. Use a vacuum hose attachment to thoroughly vacuum cracks and
crevices on furniture and along baseboards on the walls. Vacuum along
baseboards, furniture, bed stands, rails, headboards, foot boards, bed seams,
tufts, buttons, edges of the bedding, as well as the edges of the carpets
(particularly along the tack strips). A good vacuum cleaning job may remove
particles from cracks and crevices to encourage greater insecticide
penetration. Bed bugs cling tightly to surfaces, so it is best to vacuum by
scraping the end of the vacuum attachment over the infested areas to pull out
the bed bugs. Caution: It is not good to use a bristle attachment, because you
may transfer bed bugs to other areas since they cling to the brush. Dispose of
vacuum cleaner bags after you are finished in an outdoor trashcan.
Caulk and
Seal
Caulk and
seal all holes where pipes and wires penetrate walls and floor, and fill cracks
around baseboards and molding to further reduce harboring areas.
Bed Bug
Appearance
Tip: The
common Bed Bug can be seen with the naked eye. Since bed bugs are difficult to
see, use a magnifying glass.
Adult bed
bugs are brown to reddish-brown, oval-shaped, flattened, and about 1/4 to 5/8
inch long. Note: Their flat shape enables them to readily hide in most cracks
and crevices.
Tip: Eggs
are not placed on the host’s body (the person sleeping in the bed), but the
eggs are found on surfaces near where the host sleeps.
Bed Bug
Inspection Tips:
Look in any
place that offers darkness, isolation and protection to the bed bug.
Inspect
adjoining rooms where an infestation is found. Even when the bed bugs
themselves cannot be found, their hiding places can be located by looking for
the spots of fecal material they often leave.
Bed Bug
Inspection Check List
Inspect
these Areas:
The
Mattress and Box Spring
Bed
Frame and Head / Foot Boards
Other
Furniture
Walls
and Carpet
Electronics
and Appliances
The Mattress and Box Spring
Check the
mattress throughly, paying close attention to seams and tufts along the edges.
Flip the mattress over and inspect the bottom carefully as well. Pay particular
attention to any rips in the fabric. View the fabric on the bottom of the box
spring and shine a flash light to verify that bed bugs have not penetrated the
interior of the box spring.
Bed Frame
and Head and Foot Boards
Remove the
mattress and box frame from the bed frame and shine a flash light all along
every potential hiding place on the bed frame. Remember bed bugs can slip into
an crack a business card can fit into.
Other
Furniture: Desks, Chairs, Dressers, etc
Take out all
drawers and cushions from surrounding furniture. Check all seams and crevices
carefully with a flashlight. Take your time and inspect thoroughly. Bed Bugs
are commonly found in these areas in an infested room.